Used Car Buying Guide: Pre-purchase Inspection (Part 3)

This is part 3 of the Used Car Buying Guide.
In this part, I will show you how to thoroughly inspect a used car before buying it. It’s a massive topic, so the test drive will be covered separately in part 4. A good pre-purchase inspection is at least as important as the test drive though.
You will learn about the typical paintwork defects and how to spot signs of prior body repairs. I will show you how to quickly check if the tyres and brakes are still good. Finally, I will show you how to check the condition of the car interior and the engine.
Things to take with you
Here are a few things that will come in handy when you go see a used car that you would like to buy:
-
Used car inspection checklist – it will guide you through all the inspection steps so you don’t forget anything
-
A pen – to write down any problems that you find
-
A flashlight – to see the underside of the car better
-
A pack of tissues – you’ll most likely get your hands dirty
-
Wear a pair of old trousers – something that you don’t mind getting dirty
-
Useful tools (optional) – paint thickness gauge, OBD reader
Please note that this guide contains a lot of photographs, so it’s best to view it on a desktop or a laptop to see the details in the photos better.
Ladies and Gentlemen, let’s get to work!
Questions to ask when buying a used car
When you meet the seller, ask him to tell you more about the car. These are some good questions to ask:
-
Are there any problems with the car?
-
Was the car involved in any accidents?
-
Were any of the body panels resprayed?
-
Does the engine burn any oil?
-
Are there any oil leaks?
-
How old are the tyres?
-
When was the last service? What was replaced?
-
When is the next service due?
-
Does the car currently need any maintenance work?
The reason why you should ask questions is that you are more likely to get the information about the bad stuff out of the seller by asking questions rather than just expecting him/her to tell you.
If you don’t ask, the seller is unlikely to volunteer information about the problems with the car. It’s not in the seller’s best interest to tell you that the tyres are 10 years old or that the engine valve cover is weeping oil.
Withholding information is called lying by omission and I wrote about in part 2 of this guide: Choosing a Used Car. If you haven’t read it yet, follow this link.
Ideally, ask some of the questions above early on. You will then be able to verify if the seller is trustworthy by checking yourself if what the seller said is true.
It’s great when you are buying a car from a private owner who knows the car well and wants to share information. However, that’s not always the case. Often, you’ll need to do some digging yourself. Better safe than sorry!
Used car body inspection
Checking the car bodywork and paintwork is the longest part of the pre-purchase inspection. I recommend doing it before starting the engine or even looking at the interior of the car. You will need to do a couple rounds around the car, each time looking for different types of problems.
First, look for any defects in the car body and paint:
-
Scratches
-
Dents
-
Corrosion
Use the inspection checklist to make notes and keep track of the progress.
Scratches
Have a look at the diagram below to understand the layers in the car’s paintwork.

The first layer is the primer. The primer protects the metal and ensures that the base coat of paint adheres well.
Then there is the base coat (colour) and finally the clear coat.
The clear coat is the thickest layer and it’s there to protect the base coat from UV radiation, damage and harmful chemicals. It also gives the base coat that nice shine.
Now, back to the paint scratches.
Clear coat scratches
Shallow scratches that do not penetrate the clear coat can be fixed by polishing the car. These shallow clear coat scratches are not a big problem, and they are inexpensive to remove.
Polishing removes a bit of clear coat along with the scratch. It’s something that you can do yourself or leave in the hands of a car detailing studio.
Here’s an example:

The rule of thumb is that if your thumbnail doesn’t catch it, it’s a clear coat scratch that can be polished out. I don’t treat clear coat scratches as defects. They’re just normal wear and tear. Here’s another example of clear coat scratches:
Paint scratches
Deeper scratches that have damaged the base coat or the primer cannot be fixed as easily. However, as long as the primer layer has not been breached, you can choose to live with these scratches if you are buying an older car and you don’t care about the looks. They don’t look nice, but the metal underneath shouldn’t corrode for a fairly long time.
You should be aware that primer likes to soak up water so it doesn’t offer the same protection as paint. However, it is still adequate and shouldn’t cause issues for quite a bit.

Paint scratches will catch your nail when you check them. In my opinion, deep scratches like these are a very good reason to negotiate the price of relatively new used cars. Less so with older cars, but you may still be able to negotiate a discount.
Here’s a large paint scratch on a green car:
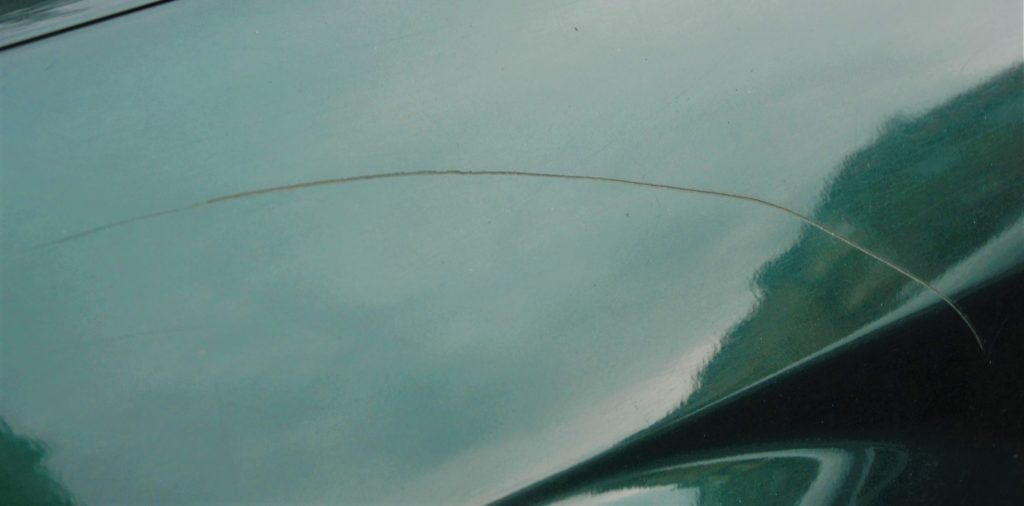
Notice that the grey primer is a lot more visible. Automotive primer is usually grey or white. If the car is black, the primer may also be black. There are other colours out there, but these are the most common ones.
On the other hand, the primer used on plastic parts is usually dark (black or dark grey). Scratches on plastic parts such as bumpers look ugly, but won’t corrode, so they are less of a problem.

Deep paint scratches
Deep scratches that expose the metal underneath need immediate attention because the metal will start corroding. If the car body is galvanized, it will hold up for a while, but eventually, the rust will move in.
Deep metal scratches are definitely a reason to negotiate the price of the car. A body panel with deep scratches like these will need to be resprayed sooner or later.
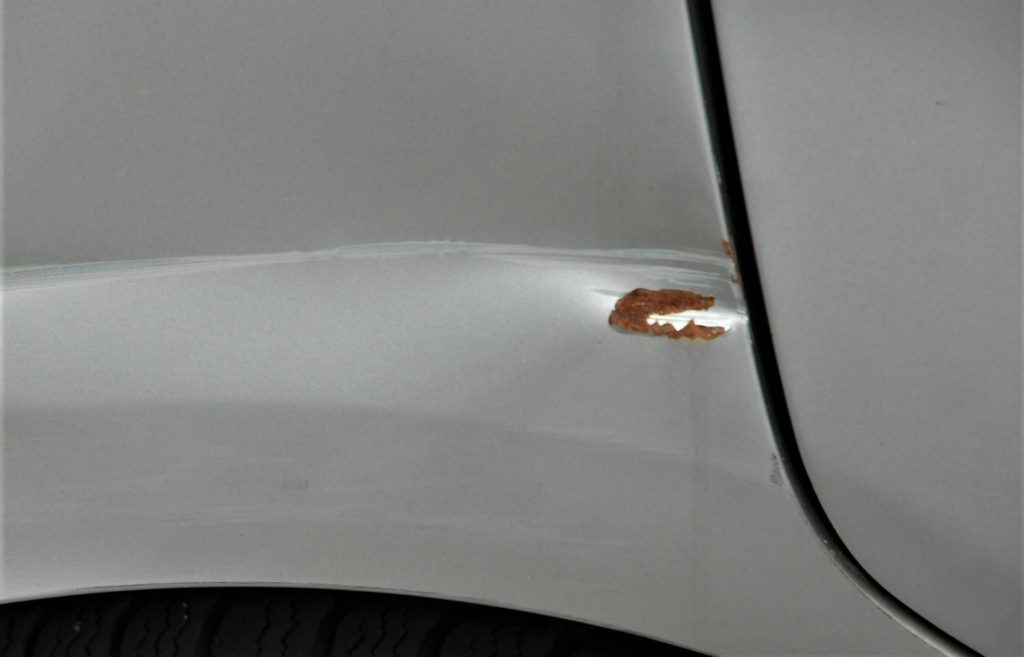
Here’s an example of a deep paint scratch that hasn’t been fixed for a while.
Hey, we are just getting started and you are already an expert on car scratches! I’m sure you are already bored with paint scratches so let’s move on.
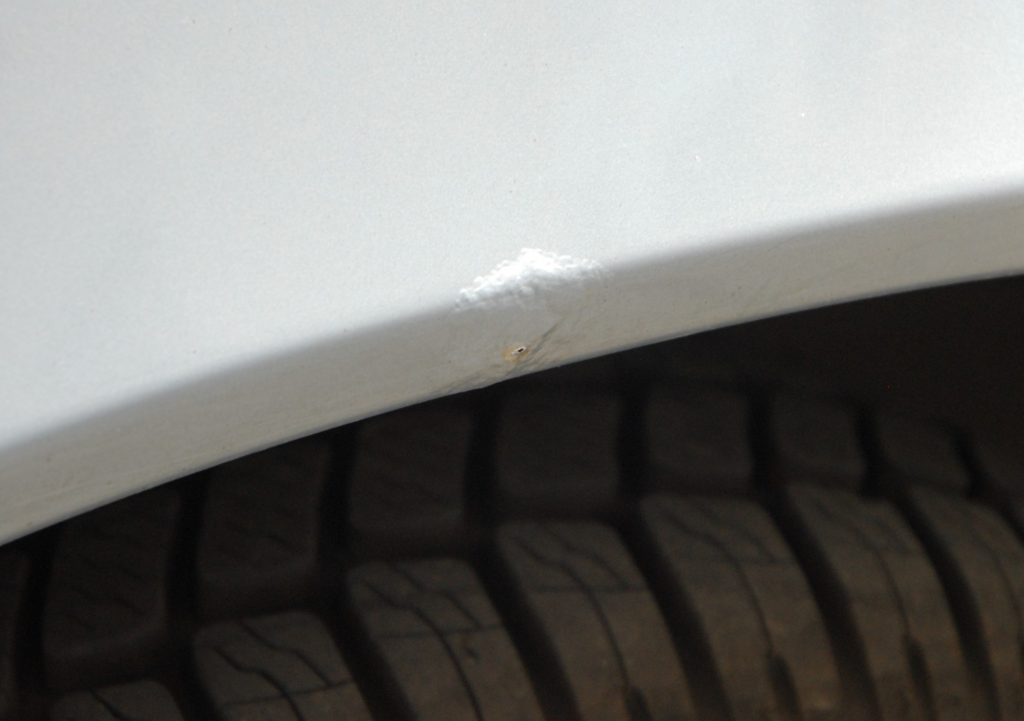
Car dents
Dents are ugly, but as long as the paint has not cracked or chipped, they shouldn’t cause further issues. What may surprise you is that dents are often easier to fix than scratches.
Many small dents can be fixed without having to respray the body panel. The process is called Paintless Dent Removal (PDR). PDR is a viable option for shallow dents without sharp edges.
Just like with scratches, dents are a very good reason to negotiate the price of a used car if it’s only a few years old.
Corrosion
Corrosion can be a big problem in used cars that are older than 10 years. While car parts can be replaced, a rusted body can be the death of a car. The problem with rust is that it the situation is often worse than it seems. You may only see a couple of small patches of rust, while the entire side sill can be rotting from the inside.
In my opinion, you should not accept any rust on cars newer than 5 years. Cars younger than 10 years shouldn’t have any rust either, and it’s a sign of poor corrosion protection if they do. Rust can also be a sign of prior body repairs. Poorly resprayed panels can corrode fairly quickly.
In old used cars, rust is often inevitable, but be careful when you encounter signs of corrosion.
The typical areas prone to corrosion are:
-
wheel arches
-
side sills
-
the underside of the doors

Oxidized headlights
We’ve now covered the typical car paintwork and bodywork defects. Before we start checking the car for signs of prior body repairs, check the condition of the headlights. See if they aren’t cracked, yellowed or cloudy. The degradation of the headlights is caused by the ultraviolet light from the sun.
The headlights are coated with a UV-protective at the factory, but this coating doesn’t last forever. Over time, plastic headlights turn yellow and become foggy.
Here’s what oxidized (yellowed) headlights look like:
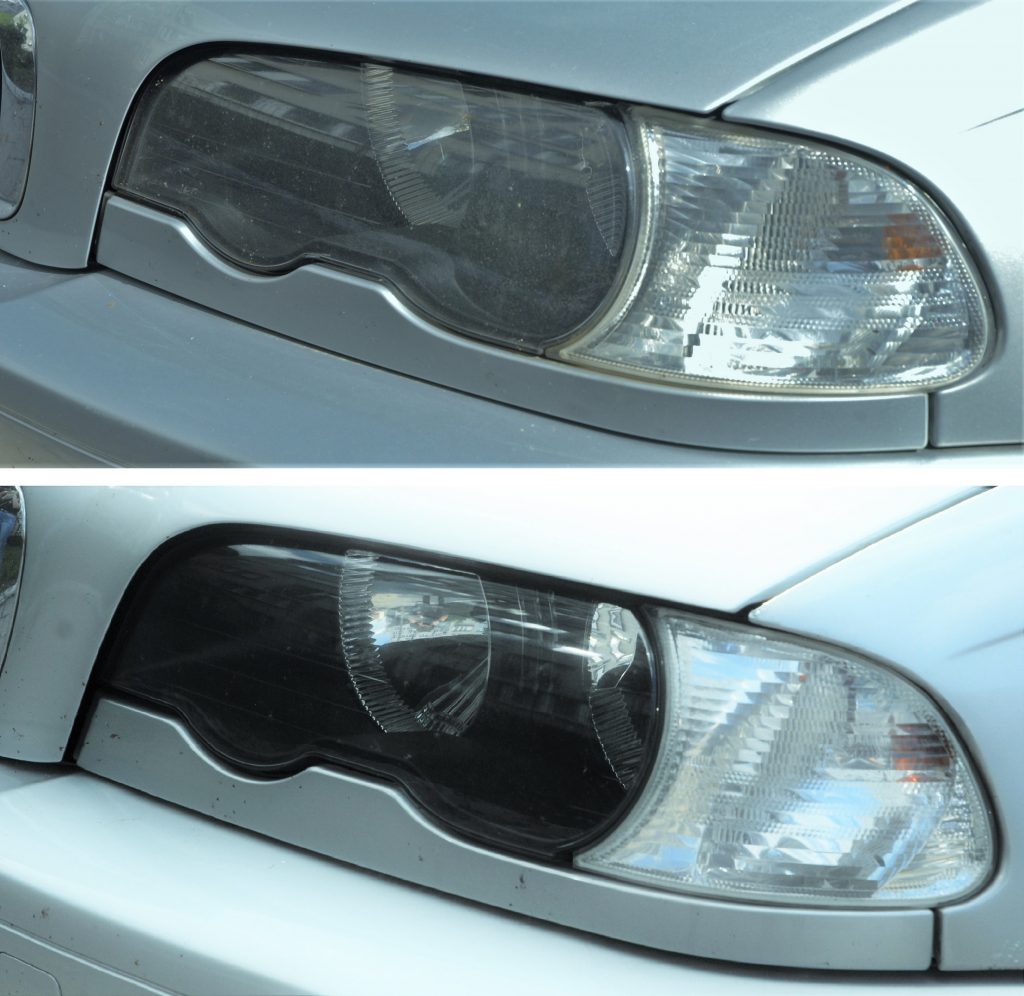
Yellowed headlights are a good argument to negotiate the price of the car. Luckily, you can fix the headlights by polishing them (removing the oxidized layer). It’s a quick and inexpensive repair.
One thing to be aware of is that polishing the headlights is a semi-permanent fix. Polished headlights will oxidize again in 2 or 3 years without the original UV-protective layer, after which you will have to repeat the procedure.
Normal wear on a used car vs your expectations
Before we continue, I’d like to say something about used cars – they are rarely perfect.
If you are buying a 10-year-old used car, it is likely to have some signs of wear. Your expectations need to be reasonable given the age of the vehicle. You don’t want to see multiple rust spots but a few scratches are perfectly normal.
On the other hand, you should expect a 3-year-old car to be nearly as good as new if it was described by the seller as “very good” and maintained well. If you find defects, you can use them as leverage to bring the price down.
Take your time and write down anything you find on the car inspection checklist.
Signs that a used car has been in an accident
Hopefully, you’ve not found anything apart from minor scratches by now. Next, you should look for signs of prior accident repairs. By now, you should have already asked the seller if the car had participated in any accidents. Now, it’s time to check for yourself. See if the seller’s story matches your findings!
Inspect the car’s body and paint again, but this time you will be looking for signs of previous accidents, body repairs or signs of a bad paint job.
The car windows have been replaced
One of the simplest things you can do to find out if the car ever participated in a large collision is to check the car window manufacturing dates. Each car window is stamped with a number that denotes the year of manufacture.
It is the number stamped next to a series of dots (which identify the month/week). For our purposes, you just need to look at the number, which is the year when the window was manufactured.
All the factory fitted windows should have the same or one year earlier date of manufacture as the car itself.
Here’s an example:
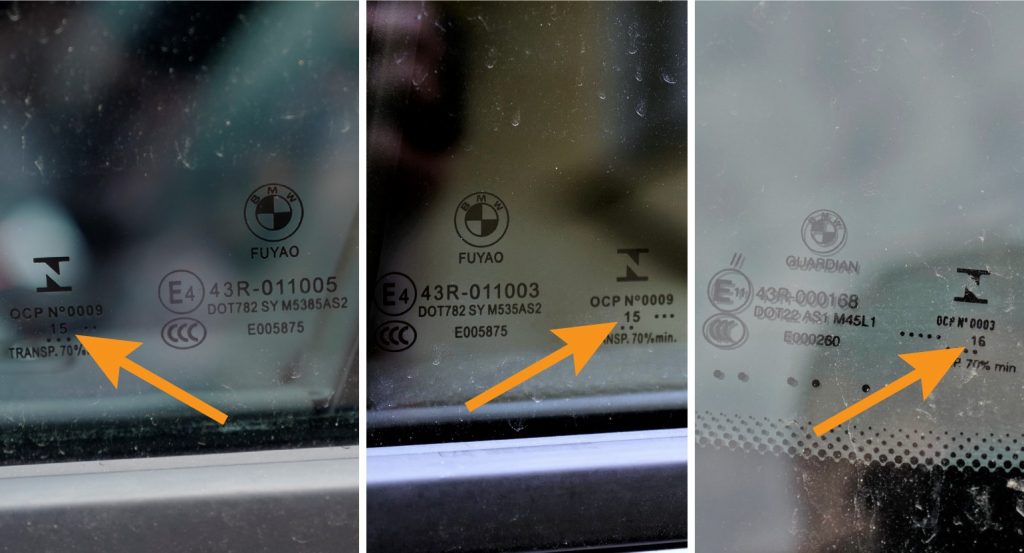
The photo above shows factory-fitted OEM windows on a 2016 BMW X1. All windows were manufactured in 2015, except the windshield, which was made in 2016.
Whenever a window is replaced as a result of an accident or a break-in, it will have a more recent year of manufacture. So, go ahead and check all the windows on the used car you are planning to buy.
By the way, notice the BMW logo and the supplier of the windows in the photo above. The windshield was supplied by a different company. This is an additional piece of information that might be useful when you encounter a car that had some of the windows replaced. In this case, the different supplier doesn’t mean anything because the production years match.
I would not attach any meaning to a windshield that isn’t original though. Windshields are often replaced as a result of stone chips. Now, a new windshield and a new door window – now you’re onto something!
On the subject of windshield chips, now is a good time to inspect the windshield for chips and cracks.
Doors that require force to close
While you’re checking the windows, also check the doors.
Open and close each door to feel if they move freely and close without using excessive force. In the event of a car collision, the car unibody may change its shape slightly if the crash was significant.
A typical symptom of a car body that was damaged in a car crash is doors that don’t close properly. So, check all the doors, including the boot lid. If you notice a difference with one of them, make a note and inspect that side of the car more thoroughly later.
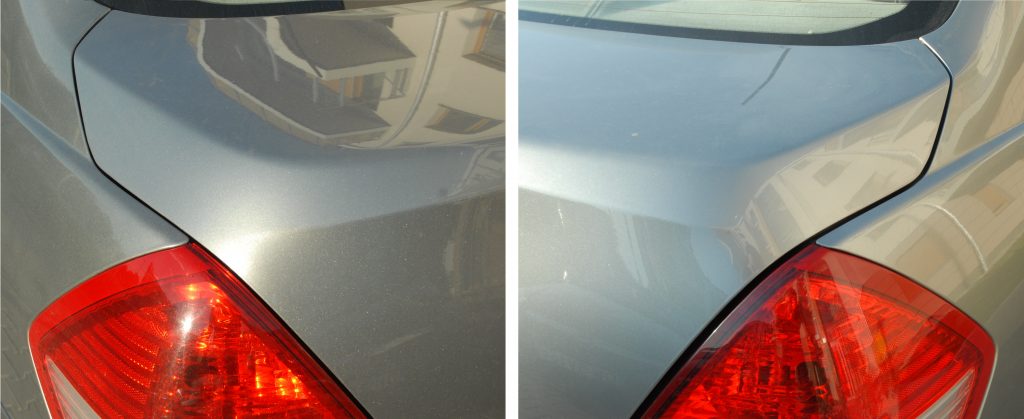
Colour mismatch between body panels
The clear coat loses it’s shine as it ages, which makes the paint look faded. If a single panel was resprayed, it may stand out from the rest of the car. See if you can find mismatched body panels on the car you are looking to buy. Usually, the resprayed panels are shinier and have “juicier” colours.
Here’s what colour mismatch looks like:

I must mention that a slight colour mismatch between the metal panels and plastic bumpers is normal. Some cars leave the factory with a slightly different shade of colour on the plastic parts. The key word here is “slightly”. Anything that’s clearly noticeable is a sign of respray.
Uneven panel gaps
Panel gaps are the spaces between body panels. When a car leaves the factory, the panel gaps are symmetrical and even. After a car accident, the repair shop may not be able to put the car back together as well as the factory did. After a big enough crash, it is very difficult to match the factory finish because things go out of alignment.
Well, a good body shop can do it nearly as good as the factory. However, even the great body shops leave clues behind.
Here’s what a very poor car repair looks like:
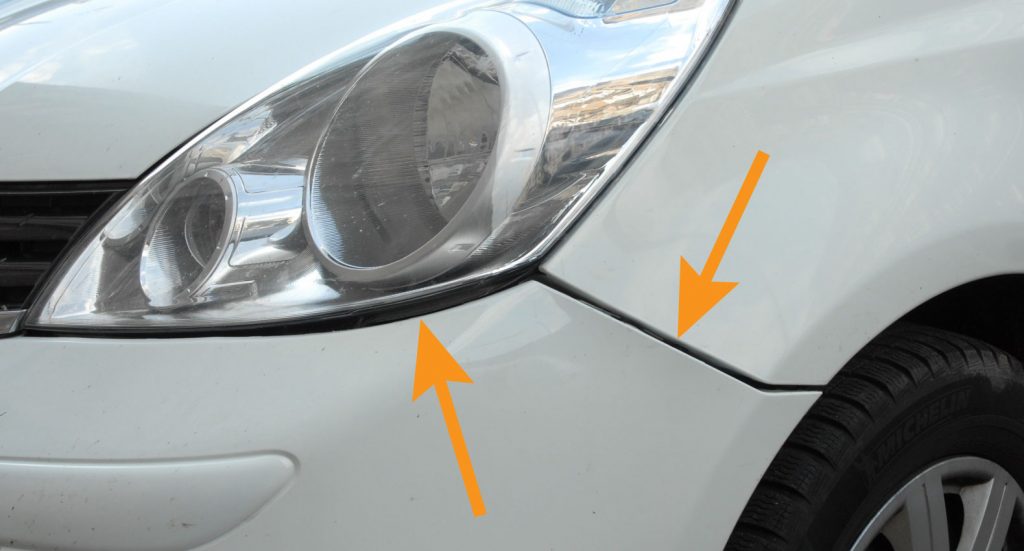
There is a huge panel gap between the bumper and the front wing (fender). Also, notice that the gap underneath the headlight is uneven and also massive.
You don’t want to buy a car that has been put together like this, regardless of its age.
Here’s a more subtle example:
When you find some uneven panel gaps, investigate that area further.
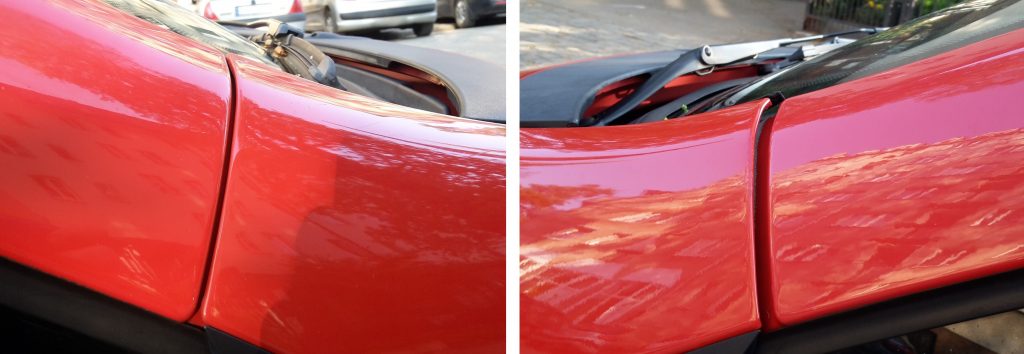
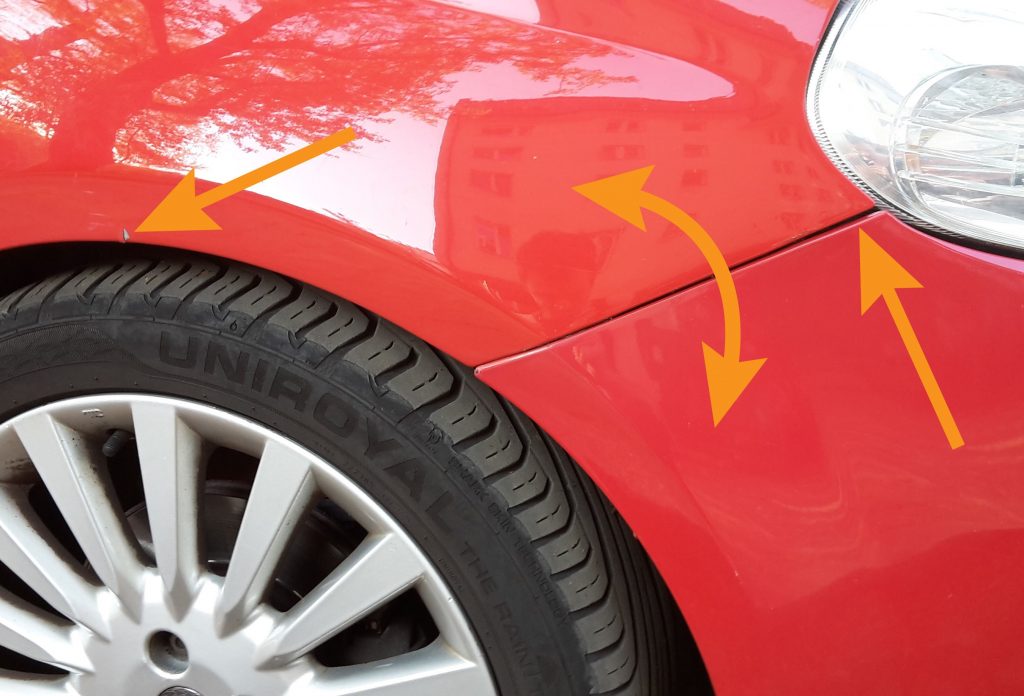
Asymmetrical panel gaps
You should also look for asymmetry in panel gaps. Try to compare both sides of the car to see if the panel gaps are the same.
Here’s an example of a large asymmetry between the panel gaps where the A-pillars meet with the front wings.
Here’s another view of the A-pillars:
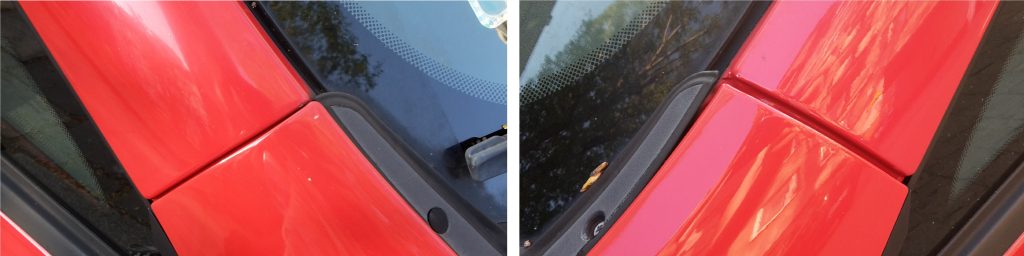
Notice the missing screw cap in the photo on the right. It looks like that front wing was removed/replaced at some point.
Below is another example of asymmetrical panel gaps on a different used car. Remember these photos, as we will look at this car more closely.
Asymmetrical panel alignment, like in the photo above, is an indication of prior bodywork or paintwork. This car may have been rear-ended.
To confirm, we will look for more clues.
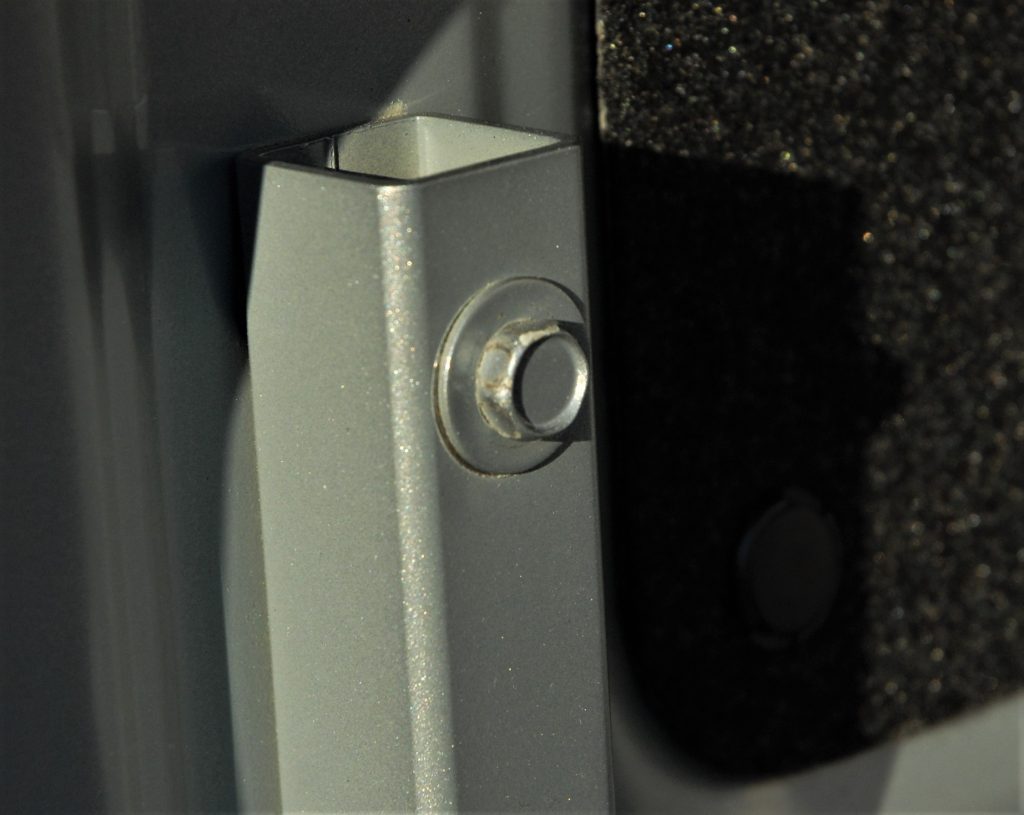
Chipped paint on painted bolts
Checking the bolts/screws that hold the body panels is an easy way to figure out if any of the body parts were ever removed from the car.
When cars are painted at the factory, their bodies are almost fully assembled (minus the plastic parts). This means that the fasteners that hold the body panels, doors, bonnet and boot lid get painted over.
When any of the panels are later removed, the paint on the bolt heads chips easily.
Below is a photo of one of the bolts that hold the boot lid. It’s the same car as in the photo above!
This is already a second clue that tells us that this particular car had some repair work performed on its boot lid. There’s also a third and fourth clue on this car, which I’ll show you in a moment.
Before we continue with that grey car, have a look at another example of a bolt that has been tampered with:
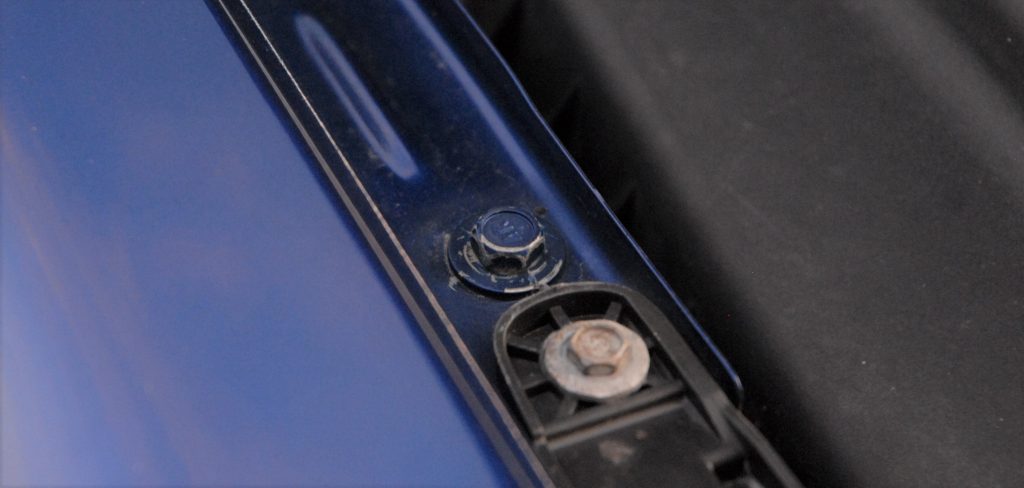
The chipped paint on the bolt head is much more noticeable on this second-hand, blue car. This is a bolt holding the front wing (fender).
The plastic headlight mounting tabs often get damaged in a frontal collision, so check if they are not cracked. This is also a good time to check if both headlights are the same (same supplier, same mounting tabs, the same amount of wear & tear).
And here’s what the factory painted bolt is supposed to look like (different car, same car model):
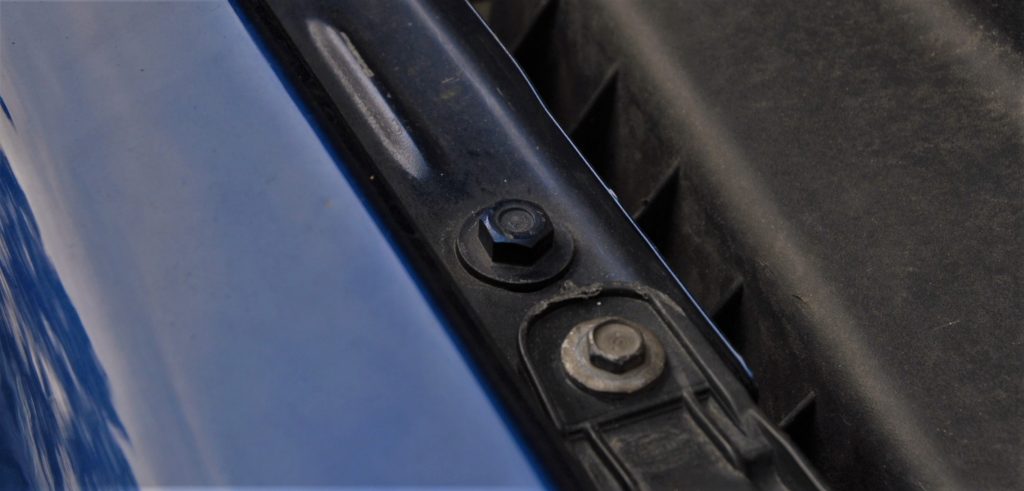
Notice that the headlight mounting tab is different from the one in the photo above – food for thought!
Paint runs and sags
Paint runs appear on vertical surfaces when wet paint moves down due to gravity. Paint runs are usually a result of heavy paint application or a rushed paint job. Cars are painted by computer-controlled robots at the factory, so a factory coat of paint rarely has any paint runs.
When a car body panel is resprayed at some point during the car’s life, it is done manually with a paint spray gun. Respraying a car requires a lot of skill for it to look perfect. Rushed or poorly repaired cars are likely to have some paint runs.
This is what a pretty bad case of paint runs looks like:
Paint runs can appear in the base coat, like in the photo above, or in the clear coat, which looks slightly less terrible.
Another thing to know is that paint likes to accumulate at the edges of resprayed panels. When you suspect that a body panel on a used car may have been resprayed, check the edges of that panel.
Now, let’s go back to that grey car that had misaligned panel gaps around the boot lid. Here’s a photo of the boot lid’s edge on that car:

Looking at the photo above, it’s another clue that tells me that the boot lid was resprayed on this particular car.
Also, there is one last piece of the puzzle:
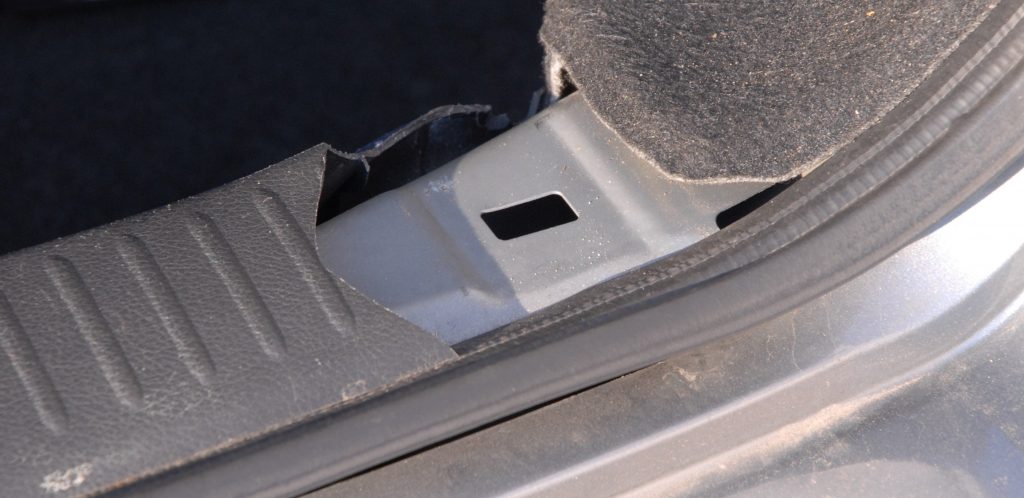
At this point, I have no doubts that this particular car has been rear-ended and repaired. The plastic cover in the photo above most likely cracked in a car crash. I don’t think the collision was a big one because I haven’t found any damage to the frame in the boot area.
To summarize, we found:
-
asymmetrical panel gaps around the boot lid
-
chipped paint on bolts holding the boot lid
-
paint run at the edge of the boot lid
-
cracked plastic cover next to the boot latch
Why are we checking all this stuff?
Personally, I don’t mind driving a car that had one or two body panels resprayed due to a scratch or a minor parking lot accident. If I can’t spot that a body panel was resprayed, then it means that it was done properly and to a high standard. Driving such cars doesn’t worry me.
The car we just discussed wasn’t repaired that well because I managed to find four clues that indicate that the boot lid was resprayed. With a bit of knowledge and experience, you should have no problems spotting bad paint jobs and poorly repaired cars.
Still, I know that many of you want to have an accident-free car with 100% factory paint. If you really want to be sure that a used car was not involved in an accident, you need a paint thickness gauge.
A digital paint thickness gauge can accurately measure the paint thickness and will tell you which panels have a factory coat of paint and which ones have been resprayed. It will also pick up body filler.
The gauge is easy to use (I’ve got one as well). You just have to touch the body panels to measure the thickness of paint and look for differences between the panels. Typically, resprayed panels have a thicker coat of paint (higher reading) and places with body filler will show a massively higher reading.
A paint thickness gauge isn’t cheap but will come in handy for all your future car purchases. It’s also a good idea to measure the paint thickness before polishing the car.
If you don’t want to spend too much money, a simple magnetic tester also works. It’s not as accurate as a digital paint thickness gauge, but it will definitely spot areas with body filler. You can get one here.
So far, we’ve checked the car body for defects as well as signs of prior repairs. There are a couple more defects that indicate a (poor) respray so it’s worth knowing about them and looking out for them in the suspicious areas.
Paint blisters
Paint bubbles are often a good indicator of a bad or a rushed respray. Blisters and bubbles usually appear a few months after a respray. Both the base coat and the clear coat can blister.
Here’s what clear coat blisters look like:

Sooner or later, the blistered paint will start flaking off and another respray will be required. Blisters in paint are a good argument against buying the car because factory paintwork should not blister unless there is corrosion underneath the paint.
Blisters indicate a respray of questionable quality that was done a few months ago.
Overspray
When individual body panels are resprayed in a car paint shop, the areas that don’t require painting are masked. When the masking isn’t good enough, the sprayed paint goes where it shouldn’t.
This unintended deposit of paint particles is called overspray. Usually, overspray can be safely removed, so in itself, it isn’t a massive problem. It is, however, a sign that some part of the car has been resprayed.
Overspray also means that the car repair shop did not do a great job. When you find overspray on a used car, it means that the masking wasn’t very good and that whoever was respraying the car did not want to spend any extra time removing the overspray.
Overspray looks like mist, and it is rough to the touch (a bit like sandpaper). It can be seen fairly easily on windows.
When you suspect that a body panel has been resprayed on a used car, see if there’s any overspray on neighbouring panels and windows.
Check the windows and the rubber seals. Slide your fingers over nearby body panels. They should all be smooth.
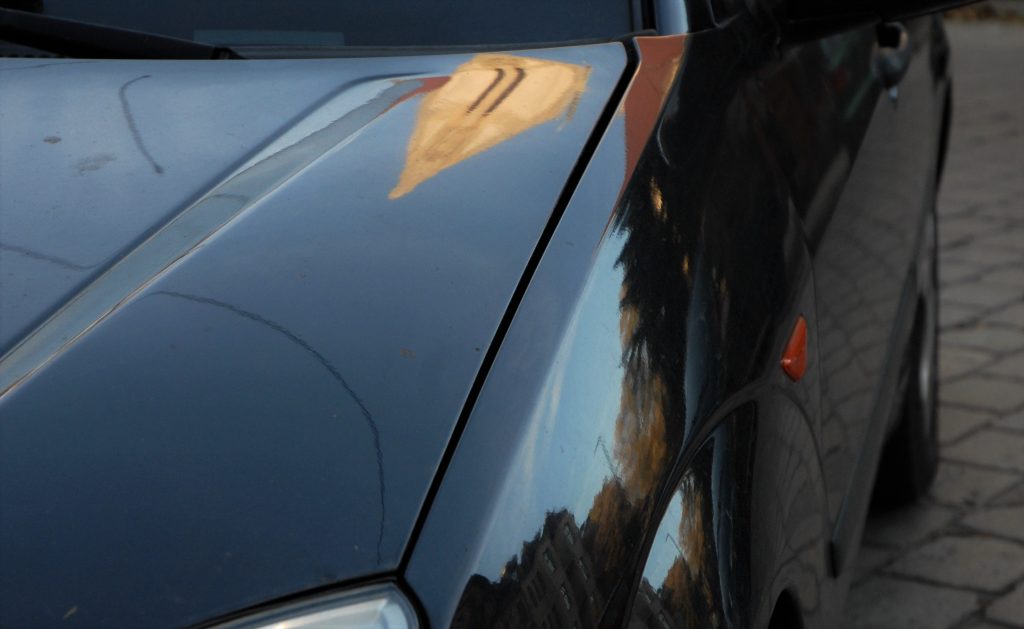
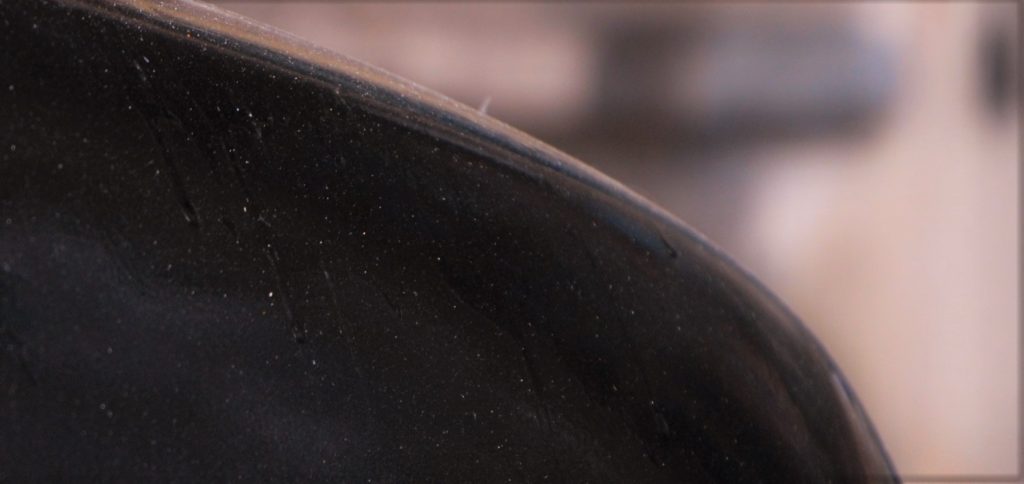
Orange peel
As the name implies, orange peel is a paint defect that looks like the skin of an orange. It’s a visual effect that you can’t feel with your fingers. Orange peel doesn’t necessarily mean that a car has been resprayed. Factory paint may also contain some orange peel.
The key here is to look for panels that stand out. If the entire car has a bit of orange people, it’s probably how it came out from the factory.
On the other hand, if you see orange peel only on a single body panel, then it’s likely that the car has been resprayed in that area. Orange peel is like cellulite on cars – harmless apart from not looking too good.
You don’t need to look for orange peel on the whole car. Just see if there’s a difference on a body panel that you think was resprayed. If all the panel gaps and bolts that hold the body parts are untouched, I wouldn’t bother looking for orange peel.
Here’s what orange peel looks like:
Here’s another angle:
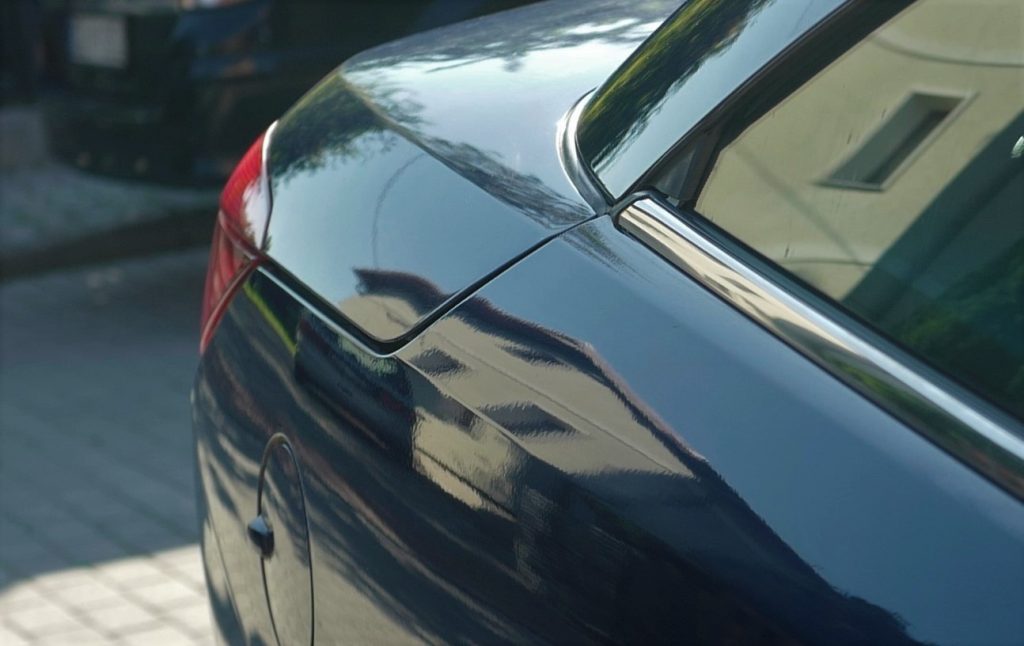
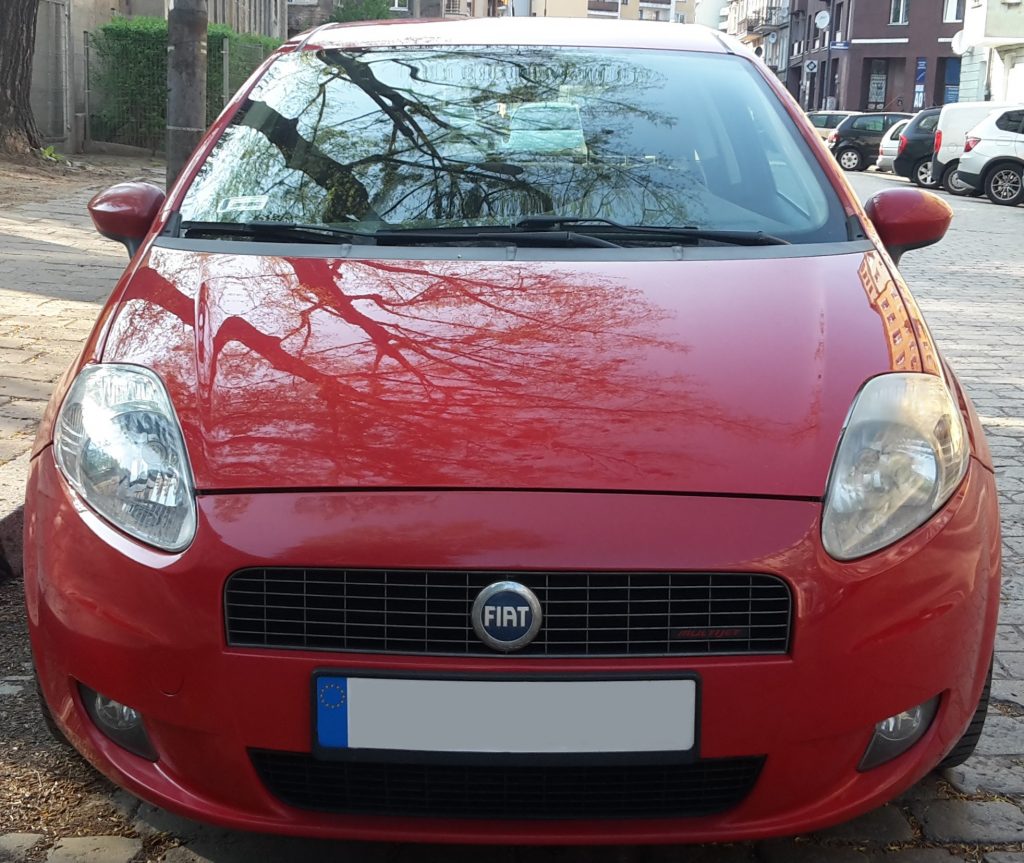
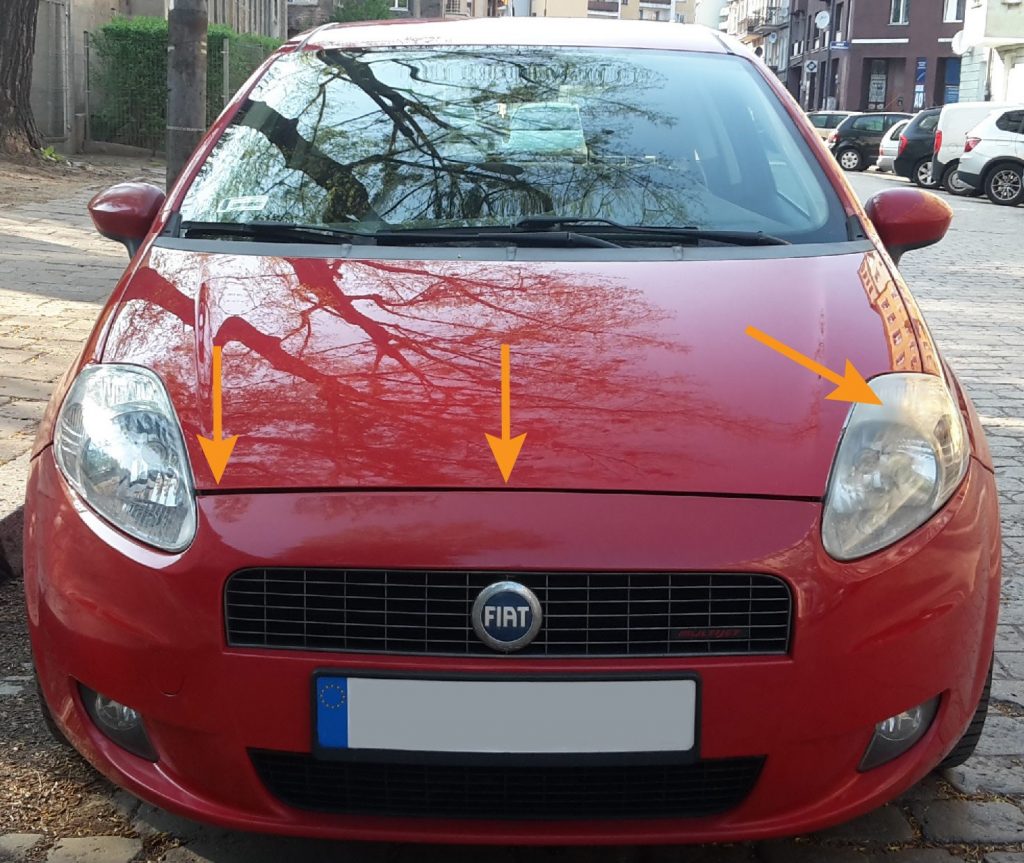
Test your knowledge – inspect this used car
Test your knowledge by looking at a second-hand car below and pointing out any signs of accident repairs. Then press on the buttons underneath the photographs to see the answers.
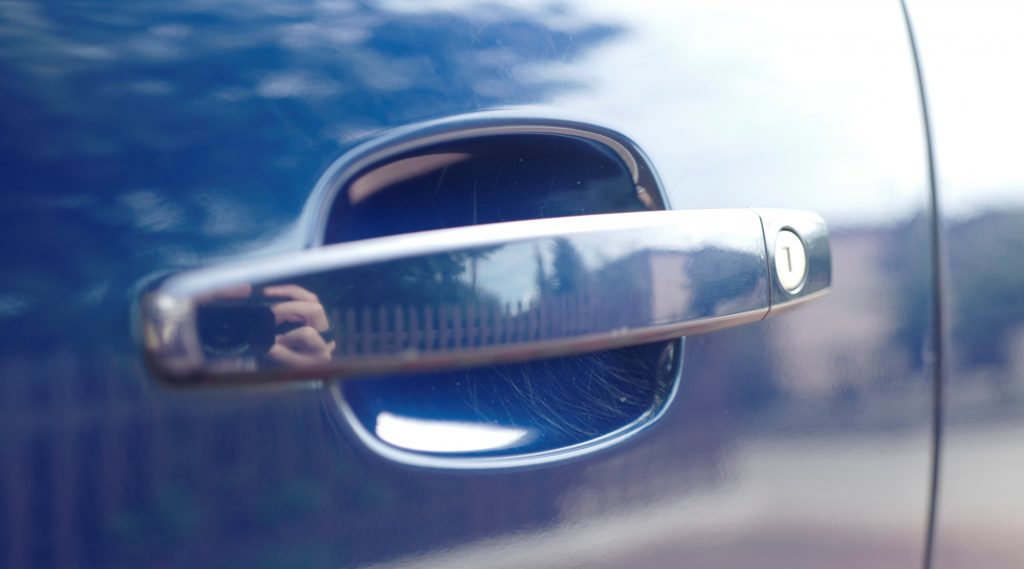
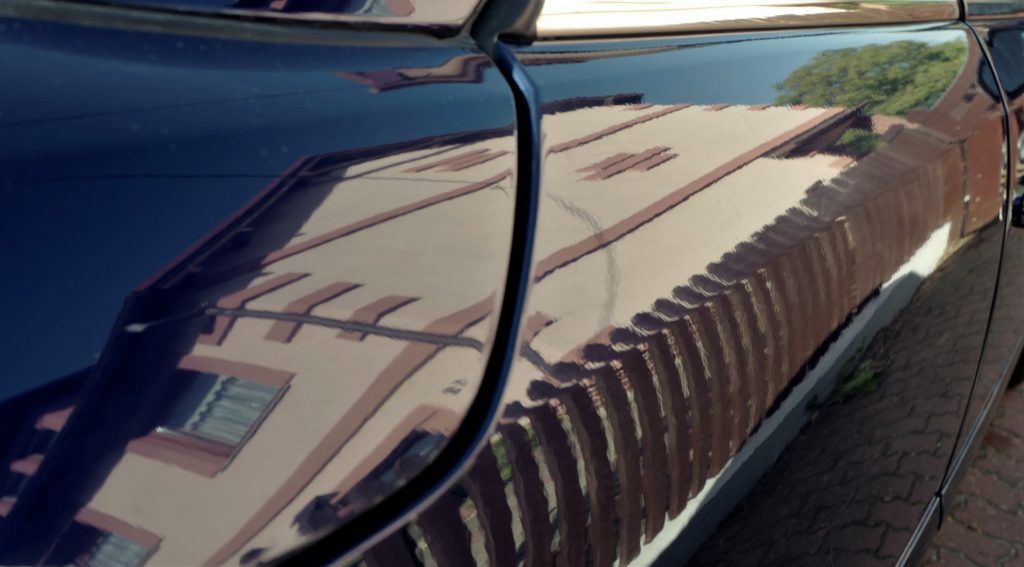
Here’s another question. What are the problems in the photo below (apart from how big my head looks in the reflection)?
To finish this section about bodywork and paintwork, here’s a fun video to watch. It shows the process of removing dents and respraying the car without replacing the panels:
Using body filler is how small dents, like the ones in the video above, can be fixed without having to replace an entire body panel (filler is cheap). In case of more extensive damage, you would expect a good body shop to replace the panel instead of adding a ton of automotive putty.
Click on the video below to see a car with an absolutely ridiculous amount of body filler. Whoever sculpted that thing must be the next Michaelangelo. It’s a shame he’s in the wrong profession!
Cars like the one in the video above are a great reason to buy a paint depth gauge.
And we are done with the exterior of the car! Don’t worry if it feels overwhelming. The used car inspection checklist will guide you through the inspection.
With a bit of practice, you will be able to tell which car body panels have been repaired and which ones are still original. Practice makes perfect, so go inspect your current vehicle or a friend’s used car. Just don’t upset your friend if you find anything dodgy!
I must warn you that you might not see the repairs that were done to a high standard (unless you’re very experienced).
If you are buying an expensive car or it’s very important to you that your new used vehicle is 100% accident-free, I recommend getting a digital paint depth gauge. It’s easy to use and very accurate. However, if you don’t want to spend as much money, a simple magnetic tester is also fine for finding body filler.
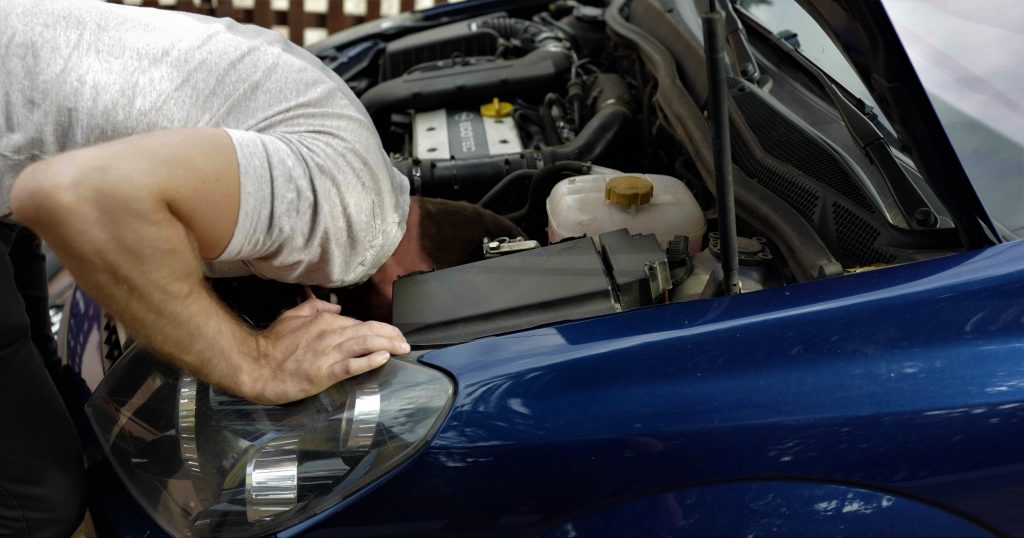
Things to check under the bonnet
The bonnet is most likely already open as you have been probably looking at the bolts that hold the front wings and checking if the headlight mounting tabs are not broken.
You should now check all the car fluid levels. Low levels are a sign of neglect (or a leak somewhere). You can also tell a lot from the color of certain fluids.
Engine oil
Use the dipstick to check the engine oil level. It’s also a good opportunity to ask the seller some more questions about oil changes. Look for an oil change tag/sticker under the bonnet.
The oil level should be correct. It’s a red flag if it isn’t (car burning oil? oil leak? neglect?). Also, look at the colour of the oil. In petrol cars, it should be the colour of honey when the oil is fairly fresh. If it’s dark, then it means that it hasn’t been replaced for some time. The darker the oil, the older it is.
Ask the seller about the last oil change. It would be a major red flag if the oil looks burnt and old, but the seller claims that the car has had the oil changed recently.
This is what engine oil with a few thousand miles on it looks like in a petrol car:
In diesel cars, you can’t tell much from the colour of the oil. It will simply be black. Here’s what engine oil looks like in a diesel car:
Keep in mind that the engine oil should not be black in a petrol-powered car. If it is black, then it means that it has not been changed for a very long time.
Also, it’s good to know that petrol direct-injection engines generate more soot than port-injected engines, so the oil will turn black quicker.
Beware of the chocolate milkshake
When looking at the colour of the engine oil, you don’t want to see any milky residue.
After checking the dipstick, open the oil filler cap and look for a substance that resembles chocolate milkshake or mayonnaise under the cap. There should be none. The milky-looking substance is water or coolant mixed with engine oil.
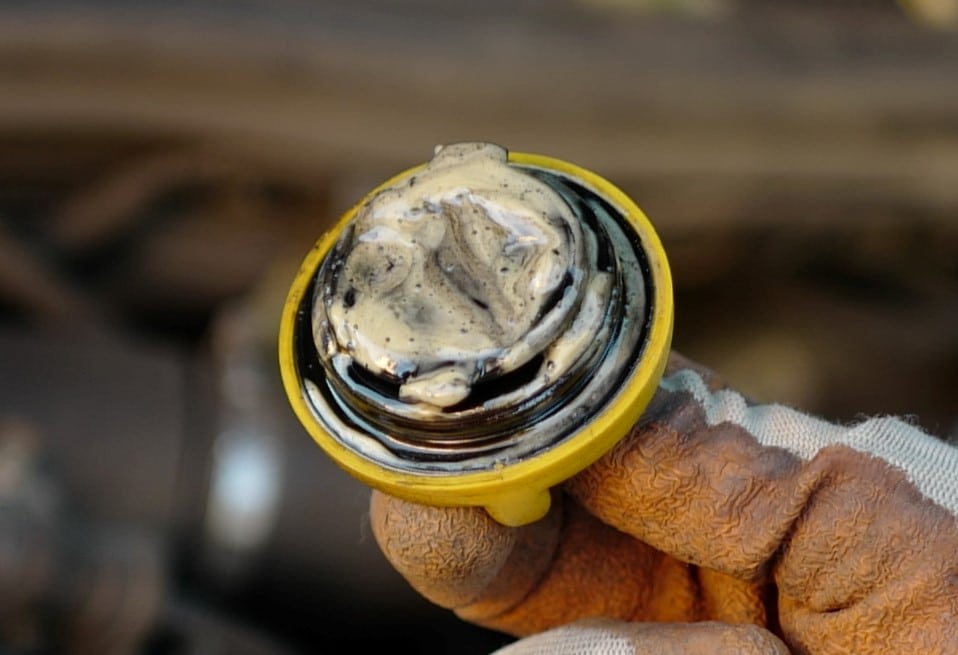
Sometimes, the milky substance can appear under the oil fill cap when the car only travels short distances. Driving short distances increases the amount of moisture in the engine oil.
Or, it could be a sign of a failing head gasket. Chocolate milkshake under the oil cap is a classic giveaway of a head gasket leak.
Do not buy a used car with signs of moisture inside the engine. It could be just condensation, or it could be a blown head gasket, and that’s a serious problem.
Chocolate milkshake may be delicious, but it doesn’t belong inside a car’s engine.
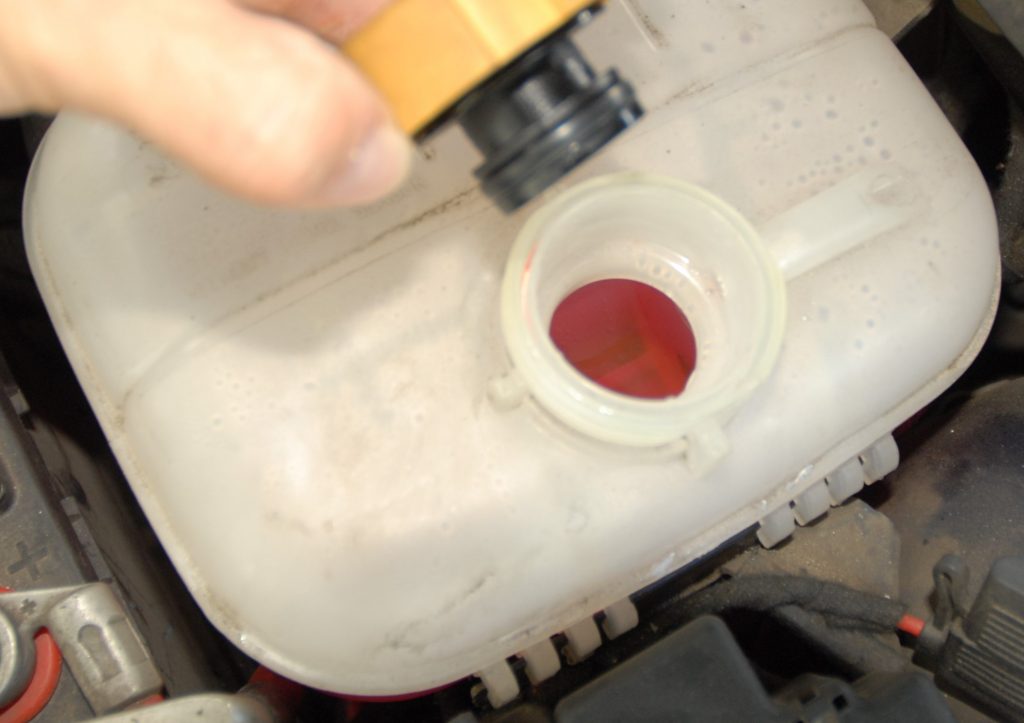
Engine coolant
You should definitely have a look at the coolant reservoir to check if the antifreeze level is correct.
The antifreeze comes in a variety of colours, most commonly green, pink or orange. Regardless of the shade, the antifreeze should have a clear, bright colour. It should not look dark or muddy. You definitely don’t want to see the anything that resembles chocolate milkshake.
Brake fluid
Find the brake fluid reservoir and tap it lightly to see the level of brake fluid. It should be above the minimum marked on the reservoir. If it isn’t, then there is a leak somewhere or the car has been neglected.
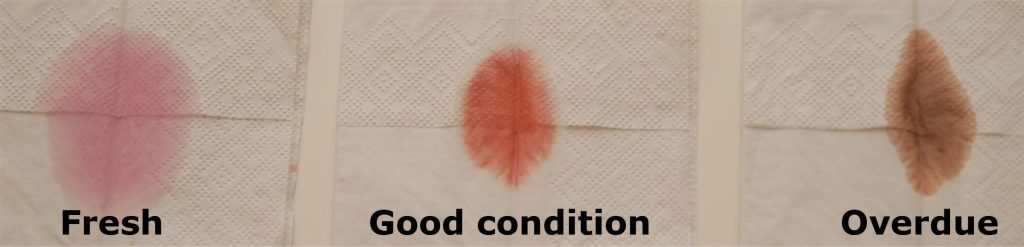
Open the cap and look inside. If there is a strainer, you can remove it to see the brake fluid better. Brand new brake fluid is clear with a light yellow tint. Over time, it becomes darker.
What you don’t want to see inside the reservoir is brown or green brake fluid. Typically, old brake fluid is brown. When it’s very old, it may turn green due to copper corrosion. Brake fluid should be replaced every two years. This is a good time to ask the seller about the last brake fluid change.
Here’s what new and old brake fluid looks like:
RIGHT: four-year-old brake fluid (overdue)
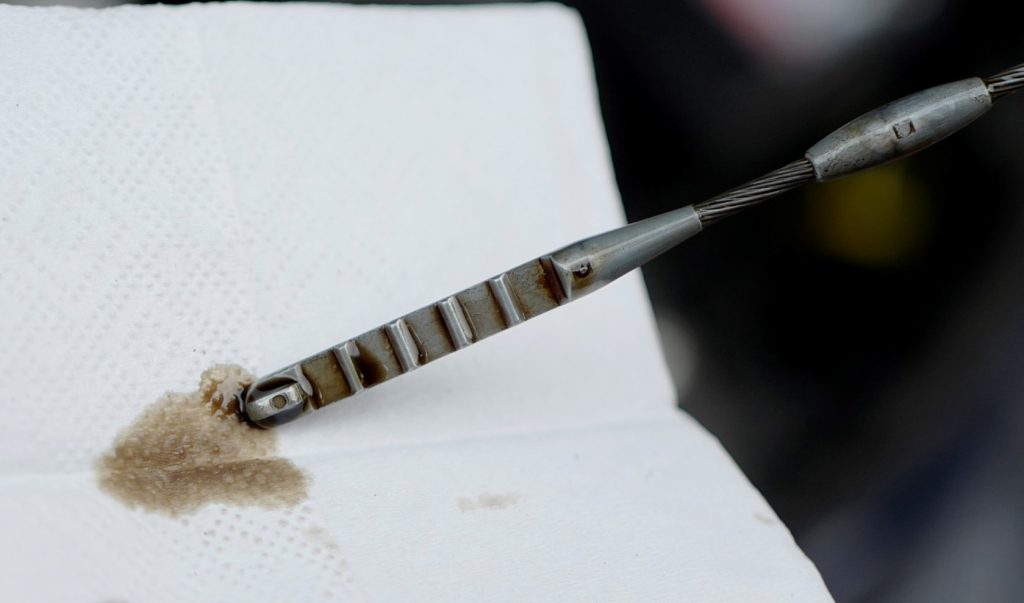
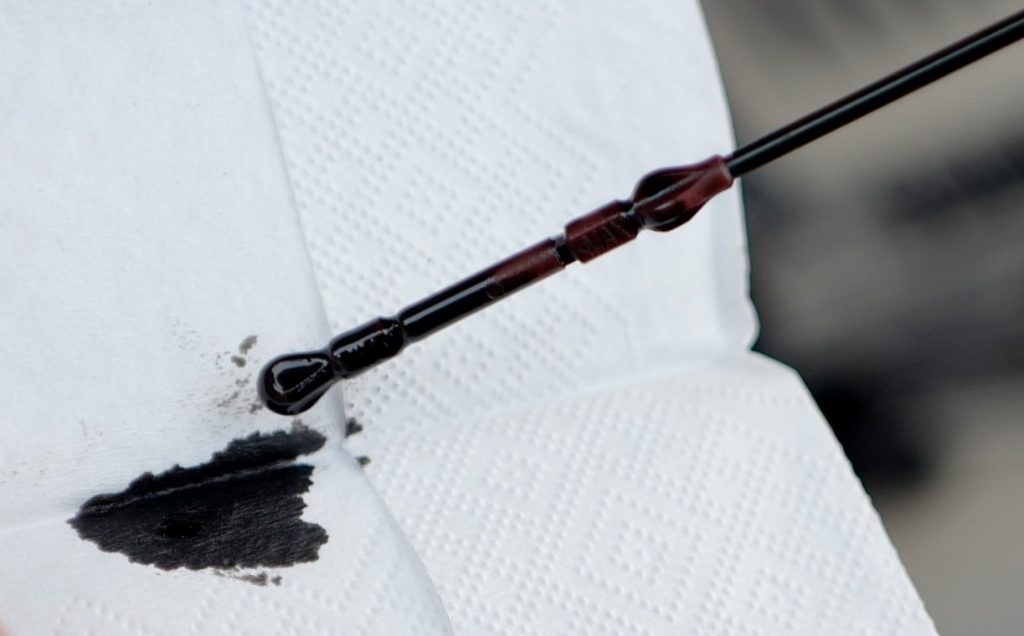
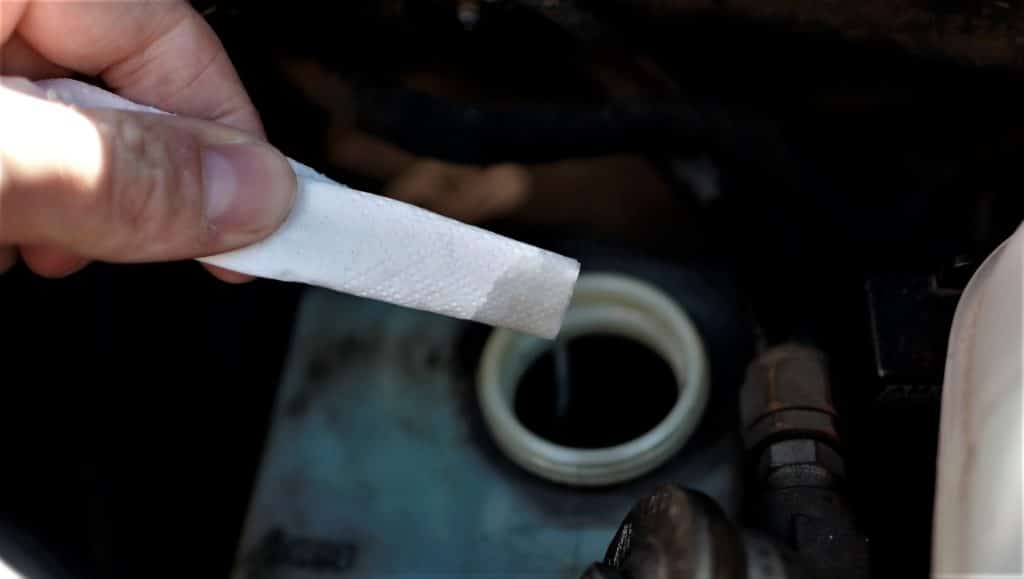
The brake fluid reservoirs are made of a fairly thick plastic. The fluid may appear dark because of that. When in doubt, you can use a tissue. Here’s what a six-month-old brake fluid looks like on a tissue:
Brake fluid reservoir in a used car. The brake fluid appears dark but looks clear on a tissue.
Brake fluid is nasty stuff that can damage the paint on the car, so don’t make a mess, and wash your hands if you accidentally touch it.
Automatic transmission fluid (ATF)
If the car has an automatic transmission, you should check the automatic transmission fluid (ATF). You should check the ATF after the test drive when the transmission is warm. The used car checklist will remind you to do it.
Here’s how to check the ATF:
With the engine running, put the transmission in Park, remove the dipstick and wipe it with a tissue. Put it back in, and pull it out again. Read the level of fluid from the dipstick.
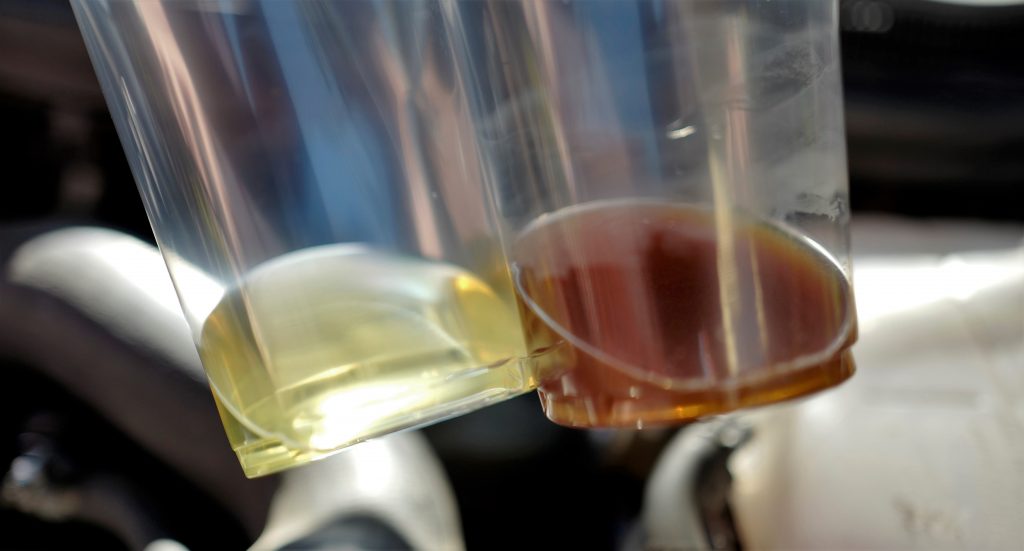
The next step is to look at the colour of the ATF. Wipe the dipstick with a tissue, and look at the tissue.
Most types of ATF are red, and brand new ATF will leave a light red stain on the tissue. Over time it becomes darker and turns brown. When you look at the tissue, you want to see a light or dark red colour.
ATF colour guide
Here’s what the ATF colour means:
-
milky pink = coolant in transmission (a major problem)
-
light red/pink = new ATF
-
dark red = used ATF, but still OK
-
brown = ATF needs replacing
-
black with particles = R.I.P.
The last step is to smell the ATF, like the car connoisseur that you are. Seriously, take a whiff.
The ATF has a characteristic smell due to its sulfur content and other additives. However, a brown fluid accompanied by a strong burnt smell is a bad sign.
Be aware that some “sealed for life” transmissions may not have a dipstick. In such a case, skip this step.
Check the car for oil leaks
Oil leaks are a common problem in old used cars, but they can still appear in relatively new cars as well. It’s good to know which oil leaks indicate an expensive problem and which ones are easy to fix. Below are my recommendations when dealing with oil leaks.
Transmission oil leaks
Transmission oil leaks are a bigger problem than engine oil leaks. While many automatic transmissions have dipsticks to check the oil level, manual gearboxes don’t. So, if you have been driving with a leaking manual transmission, the oil level can get too low without you knowing about it. Driving with a low oil level can damage the gearbox.
I recommend that you don’t buy a used car with a leaking transmission.
Engine oil leaks
An engine oil leak is also a good reason not to buy a car or at least to negotiate its price. I recommend walking away from the sale unless you can pinpoint exactly the source of the leak, and figure out how much it’s going to cost you to get it fixed.
The two places where oil leaks are usually inexpensive to fix are the oil pan gasket and the valve cover seal.
Oil pan leak
I think that the oil pan is the most common area to develop leaks. The oil pan is the lowest part of the engine, and it often gets dinged up or scratched.
Checking if the oil pan is wet with oil is one of the most important things to look at when trying to establish if the engine is leaking oil. Regardless of where the oil leak is, the oil will eventually run down the engine and accumulate on the oil pan because of gravity.
A wet oil pan is a red flag and should be investigated further. Unless you can find the source of the leak, I would not buy the car because it could be something serious, for example, a leaking head gasket.
The oil pan should be dry and dusty in a car with no engine oil leaks. If it looks like it has been cleaned, it means that the seller may be trying to hide evidence of an oil leak (or the leak was fixed recently and oil pan cleaned afterwards). Definitely ask some questions.
Leaking valve cover
The valve cover is the metal or plastic casing that sits on top of the engine cylinder head and covers the valvetrain. V-configuration engines have two valve covers (one per cylinder bank).
A leaking valve cove is usually a minor problem that shouldn’t break your wallet. In most cars, replacing a leaking valve cover seal is a fairly basic job (DIY possible).
Where to look for oil leaks in a used car
The first step in your search for oil leaks is to check inside the engine bay. Use the flashlight to illuminate dark places. Focus on the engine block and the transmission. If the car is turbocharged, try to see if the turbocharger isn’t leaking oil.
The next step will be to look underneath the car for any signs of oil leaks there. The key locations to check underneath the car are the oil pan and the flywheel bell housing where the engine meets the transmission. Most engine oil leaks cause the oil to accumulate in those two locations (two lowest points).
Also, don’t forget to check the rear differential in rear-wheel-drive cars.
Checking the bell housing is important because a failing rear crankshaft seal or a failing transmission input shaft seal will cause oil to accumulate at the bottom of the bell housing.
Both of these leaks are expensive to fix, so you should avoid buying a car with a wet bell housing (it’s where the transmission is bolted to the engine).
Here’s what you don’t want to see:
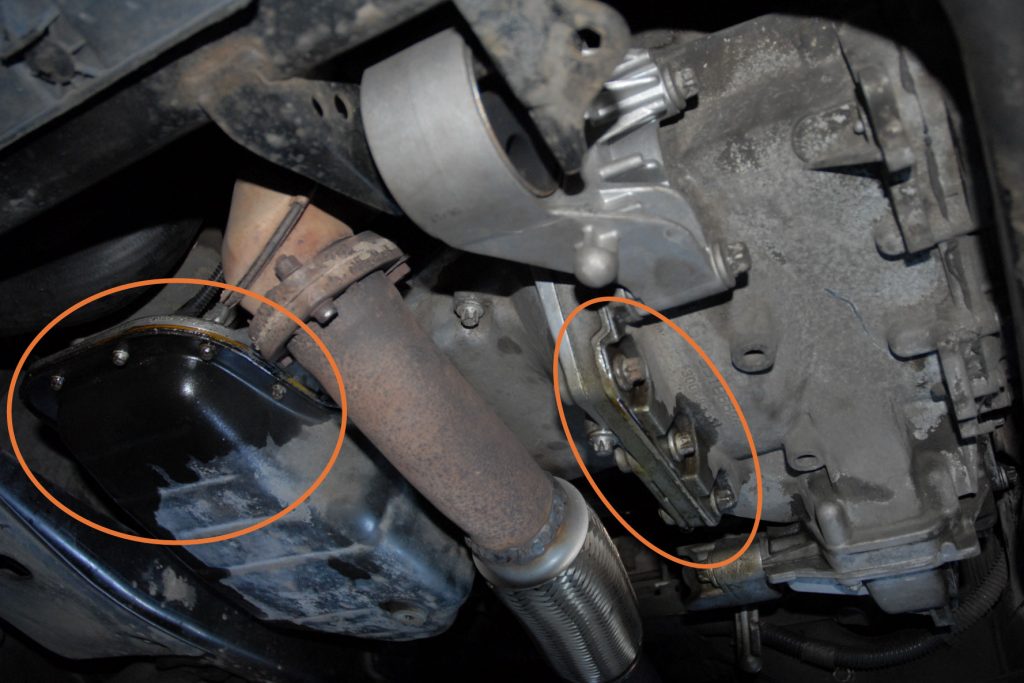
This photo above is of a transverse engine mated to a manual transmission.
The oil leak on the left could be just an easy to fix oil pan gasket leak or a more serious leak somewhere higher on the engine.
The second leak (on the right) could either be a leaking rear crankshaft seal or a leaking transmission input shaft seal. Fixing this leak will require the transmission to be removed from the car, which is expensive.
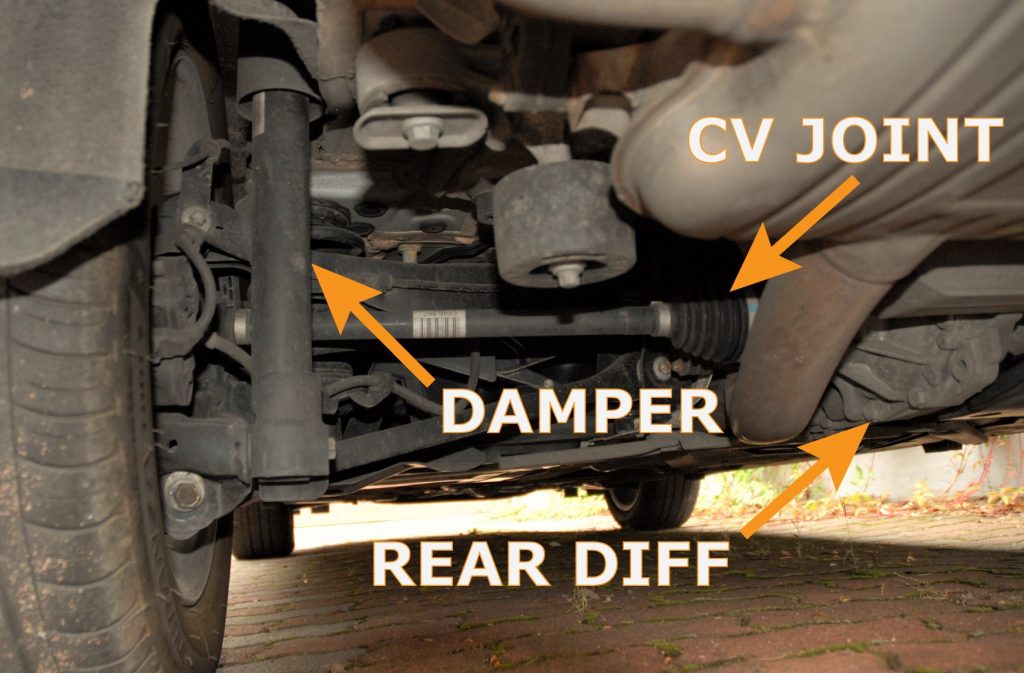
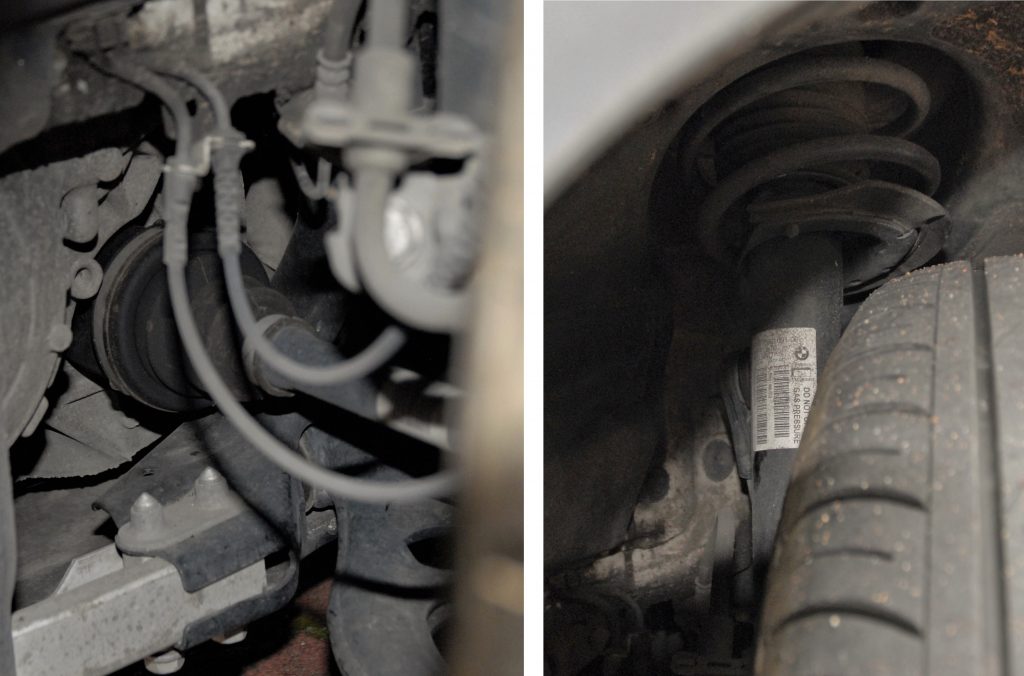
Things to check under the car
This is the least fun part. It would be much easier if you could arrange with a local garage to have the car lifted to see the underside better. The things that you should look at are as follows:
-
Engine and transmission oil leaks – as explained above
-
Axle shaft boots – the axle shafts are the shafts that connect the wheels to the differential. Check the rubber boots for cracks or grease leaking out. There are two CV joints and two rubber boots per axle shaft.
-
Oil leaks from shock absorbers – have a look at the suspension dampers (one per wheel). When they start failing, they leak oil. Remember, dry and dusty is good.
-
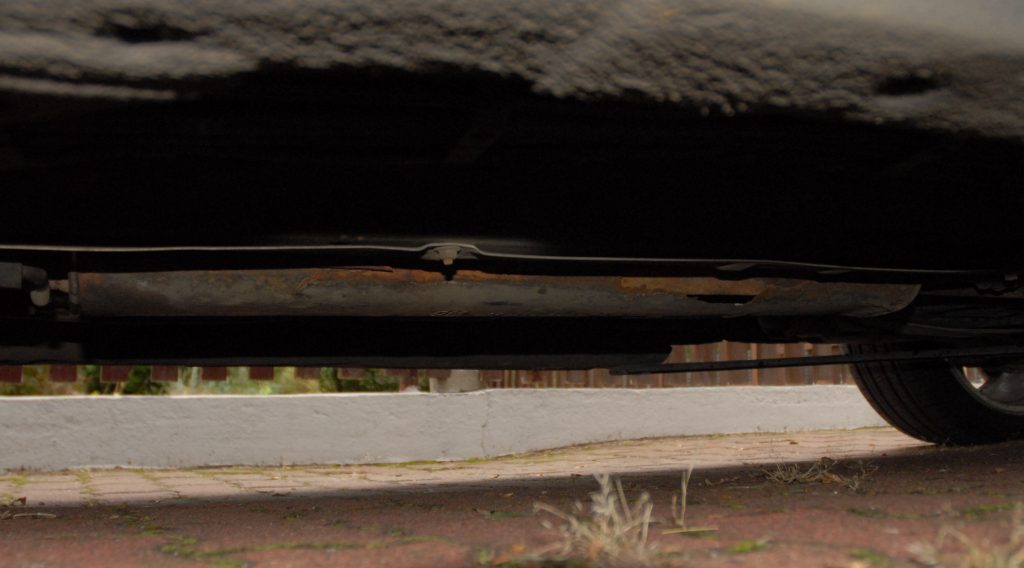
Signs of corrosion – look for rust underneath the car. Check the floorpan, the subframe components and the side sills.
-
Exhaust system – look for corrosion, bits of rusted metal flaking off and holes.

Some cars have under engine covers that prevent you from seeing the transmission or the oil pan. When you are buying a fairly expensive used car, I recommend arranging a 20 minutes inspection with a local garage. It only takes a few minutes to remove the plastic tray. It’s also much easier to inspect the car when you can get underneath it.
I’m sure that you’ll find a local garage that will be happy to help you for £20 (25$) or so.
And here’s what you may find when you look at the exhaust system:
Checking the engine in a used car
Now is the time to finally start the engine. You can learn a few things about the condition of the engine based on what happens during a cold start.
This is particularly important when buying a used car that has an engine with a timing chain. So, when you arrange a meeting with the seller, ask specifically for an opportunity to start the engine when it’s cold.
With the bonnet open, stand near the engine bay, and ask the seller to start the engine.
Here’s what you should be paying attention to:
-
Rattling noise coming from the engine that disappears a few seconds after the engine starts
-
Smoke coming from the exhaust
-
Any other problems (ticking noises, uneven idle, squeaking belt etc.)
More effort is needed to start a cold engine, so if the car battery is on its last leg, you may hear it too (slow cranking).
Timing chain or VVT noises
For the first few seconds after the engine starts, you should listen out for a rattling noise coming from the engine.
A typical symptom of a stretched timing chain or a failing chain tensioner is a rattling noise after a cold start. A similar noise may also appear when there is a problem with the variable valve timing mechanism, which pretty much all modern petrol cars have.
Read more about rattling timing chains and VVT adjusters. Follow this link to an article that explains how to check these components during a cold start. You will also find examples of the noises these parts make when there is a problem.
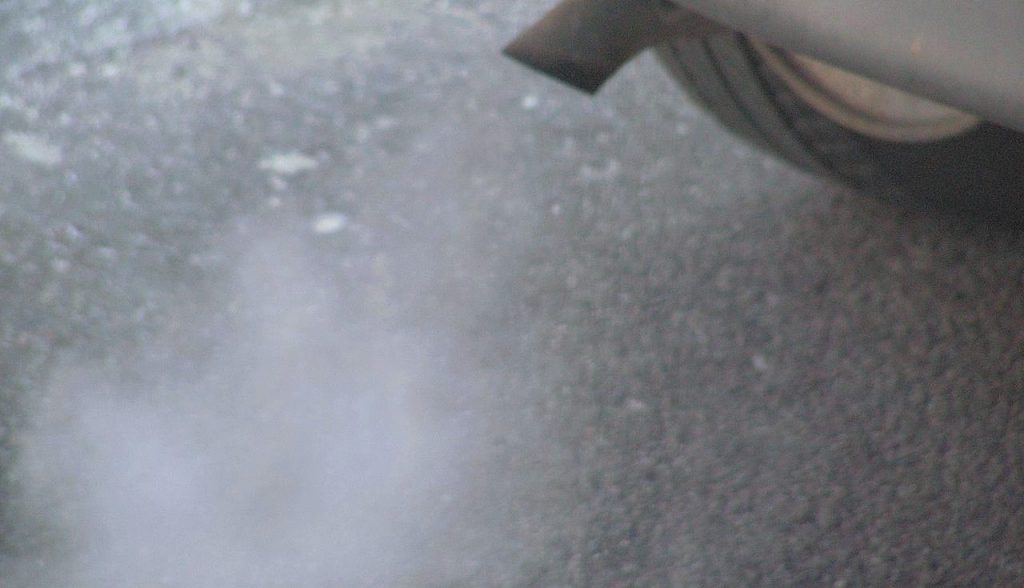
What the exhaust smoke is trying to tell you
So, you’ve started the car and listened to the engine for several seconds. Now, quickly go to the back of the car to see if there’s any smoke coming from the exhaust.
A lot can be learned about the condition of the engine by looking at the exhaust smoke. Some smoke is normal in certain conditions, while in others, there should be none. There is also a difference between petrol and diesel engines.
The paragraphs below explain what it all means. First, I will explain what the colour of the smoke means. Then, I will summarize what to look for in the form of a table.
Grey or black smoke coming from the exhaust
In petrol cars, dark smoke is a sign of a rich air-fuel mixture that does not burn fully. Grey or black smoke is typically a symptom of a fuel delivery problem, for example, a stuck injector.
When it comes to diesel cars, a bit of black smoke is normal in certain conditions. A diesel engine should not smoke in idle unless revved very hard. On the other hand, a small puff of black smoke when accelerating is okay.
A single puff of black smoke is a result of a temporarily rich mixture until boost pressure builds up (turbodiesel cars). Then smoke should disappear when the turbocharger spools up, and the air catches up with the fuelling. In other words, turbocharger lag = a puff of black smoke.
At the same time, constant smoke during acceleration is a bad sign, and there definitely should not be any smoke during cruising (low engine load). The above only applies only to diesel cars without a diesel particulate filter.
To sum up, cars with a DPF and petrol cars should not emit any black smoke.
Blue smoke coming from the exhaust
Grey smoke with a blue tint means that the engine is burning oil. In normal operating conditions, very little engine oil should be entering the combustion chamber. Blue smoke means that quite a lot of oil is finding its way into the engine cylinders, where it then burns.
This is what blue smoke looks like:
There are a few reasons why an engine may emit blue smoke. These are the common ones:
-
worn-out or stuck piston rings (major problem)
-
worn-out or cracked valve guides (major problem)
-
worn-out valve stem seals (moderate/major problem)
-
leaking turbocharger seals (moderate problem)
-
broken PCV valve (minor problem)
I won’t go into details about these problems, but the first three reasons for high oil consumption can be very expensive to rectify.
Blue smoke is a major red flag. You cannot really tell what the oil consumption is during a short test drive. If you see blue smoke, don’t buy the car as it could turn out to be an oil guzzler.

White smoke coming from the exhaust
White smoke means that water is present in the combustion chamber or in the exhaust system.
Thin, white smoke after cold starting the car in winter is normal. It’s caused by condensation build-up in the exhaust system. What you see isn’t really smoke but water vapour. It becomes visible only in cold weather.
If the level of coolant is fine, it’s normal to see a little bit of white smoke after a long standstill (couple hours) when the temperatures outside are low (below 10 °C / 50 °F). This is fine as long as the smoke is not excessive.
On the other hand, white smoke should not be present when it’s warm outside. In this case, the white smoke may be a sign of a head gasket problem.
Reading the smoke signals
Here’s a summary of what the different types of smoke are likely to mean:
| When does the smoke appear? | Petrol cars | Diesel cars |
|---|---|---|
| Cold start + warm weather | No smoke allowed White smoke = head gasket leak Blue smoke = leaking valve stem seals | No smoke allowed White smoke = head gasket leak White smoke = incomplete combustion (fuel injector problem) Blue smoke = leaking valve stem seals |
| Cold start + cold weather | Thin white smoke = condensation (this is normal) Thick white smoke = head gasket leak | Thin white smoke = condensation (this is normal) Thick white smoke = head gasket leak Thick white smoke = incomplete combustion (a problem with the fuel injectors or glow plugs) |
| Smoke when accelerating (after a period of idling) | No smoke allowed Black/Grey smoke = fuel delivery problem Constant blue smoke = worn-out piston rings Single puffs of blue smoke = leaking valve stem seals | Single puffs of black smoke = turbocharger lag (normal in older diesel cars) Constant black smoke = worn-out injectors or turbocharger Constant blue smoke = worn-out piston rings Single puffs of blue smoke = leaking valve stem seals |
| Cruising | No smoke allowed | No smoke allowed |
| Idle | No smoke allowed | No smoke allowed |
There are two checks that you should do regarding exhaust smoke when buying a used car:
-
Look for smoke during a cold start
-
Look for smoke when accelerating after idling the engine for 5 minutes
Here’s how to do the second test:
First, let the car idle for about 5 minutes. Then, ask the seller to drive away quickly (get the engine RPM into the upper half of the rev range). As the car takes off after a period of idling, look for any bluish smoke upon acceleration. If it’s a diesel car, also look for black smoke.
This test will tell you if there’s a problem with the fuel injection, valve stem seals, turbocharger seals and even piston rings. It goes like this:
-
Constant blue smoke during acceleration = worn or stuck piston rings
-
A puff of blue smoke when taking off after a period of idling = worn valve stem seals or a leaky turbocharger
-
Petrol cars: black/grey smoke = fuel delivery problem
-
Diesel cars without a DPF: single puff of black smoke = nothing to worry about
-
Diesel cars without a DPF: constant black smoke = worn out injectors or turbocharger
An even better test to do would be to have a friend drive behind you during your test drive and look for any smoke during acceleration or when taking off from the traffic lights.

Check the power steering
After looking for smoke coming from the exhaust, have one final look at the engine. Is it running evenly? Is it not shaking excessively? Are there any unwanted noises coming from the engine, for example, ticking?
If everything is okay, now is a good time to do a quick power steering check.
The power steering can be hydraulic or electric. Electric power steering is the newer technology, and it’s what car manufacturers tend to install these days. In older used cars, you are likely to see hydraulic systems.
A quick power steering check is to turn the steering wheel all the way in both directions. With the windows and the bonnet open, listen for a whining noise coming from the power steering pump. The pump should be quiet and you should only hear the pressure-relief valve open at full lock. It’s a very gentle hissing sound. Any whining or groaning noises are a bad sign.
This check is meant for used cars with hydraulic power steering. If the car has electric power steering, it should be quiet or completely silent.
Leave the wheels turned as you will now be looking at the tread on the front tyres and the front shock absorbers.
Wheels, tyres & brakes
You should now do a visual inspection of the tyres. If the car has alloy wheels, you should also check them for kerb damage. Lastly, you should visually check the condition of the brake discs.
I will explain the steps in a moment.
But before you do any of this, check if the car is sitting level. If the car is leaning to one side, one of the suspension springs may be broken. The car must be standing on an even surface for you to do this check.
So, have a quick look at the gaps between the wheel arches and the tyres. If all the gaps are even, continue to the next step – checking the tyres.
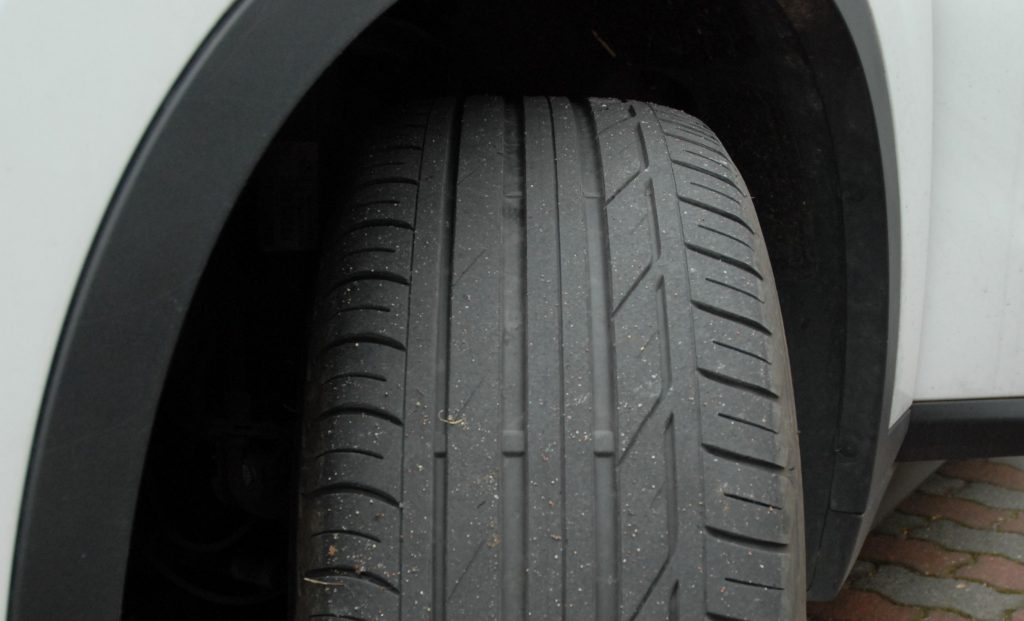
How to check the tyres
There are four things that you want to check regarding the tyres:
-
Tyres on the same axle should be the same
-
Tread depth – minimum 3 mm (0.12″) for summer tyres and 4 mm (0.16″) for winter tyres
-
Tyre age – maximum 10 years
-
Check for uneven wear and sidewall damage
Tyres on the same axle
First, check if the tyres across the same axle are the same. Tyres should be replaced in pairs and one should not mix tyres on the same axle. So, have a look at each tyre to see what make it is.
It’s a red flag if the tyres are different – it usually means that the seller was too cheap to replace both tyres, which tells you a lot about how the car has been maintained.
You shouldn’t drive a car with two different tyres on the same axle, so it will be up to you to fix this problem if you buy the car. Therefore, this is a good argument to negotiate the price of the car. Have no mercy.
Tyre tread depth
Check the tread depth on each tyre. New tyres start with about 8 mm (0.32″) of tread.
You should consider replacing summer tyres when the tread is down to 3 mm (0.12″). Any less than 3 mm increases the braking distance and has a negative impact on car’s handling on wet roads.
As for winter tyres, when the tread gets below 4 mm (0.16″), their performance in snow is reduced.
I know that the legal limits (in most countries) are lower than the numbers I quoted above. However, you should treat the legal limit as the absolute minimum and replace the tyres a bit earlier. Tyre performance starts to decrease quickly once you go below 3 mm of tread for summer tyres and 4 mm for winter tyres.
Tyre age
The next step is to locate the DOT code on the tyres to find out the tyre manufacturing date. Tyres approaching 10 years of age should be replaced. Don’t be tricked into thinking that the tyres are still good because they have some tread left on them. Rubber deteriorates with time, so the age of the tyre is also important.
Here’s what the DOT code looks like and how to read it:
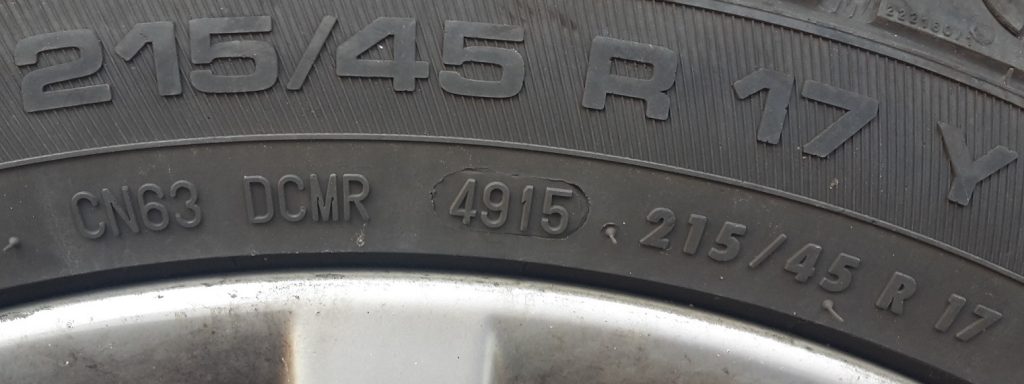
The first two digits denote the week and the second two digits represent the year. Therefore, the tyre in the photo above was produced in the 49th week (November) of 2015.
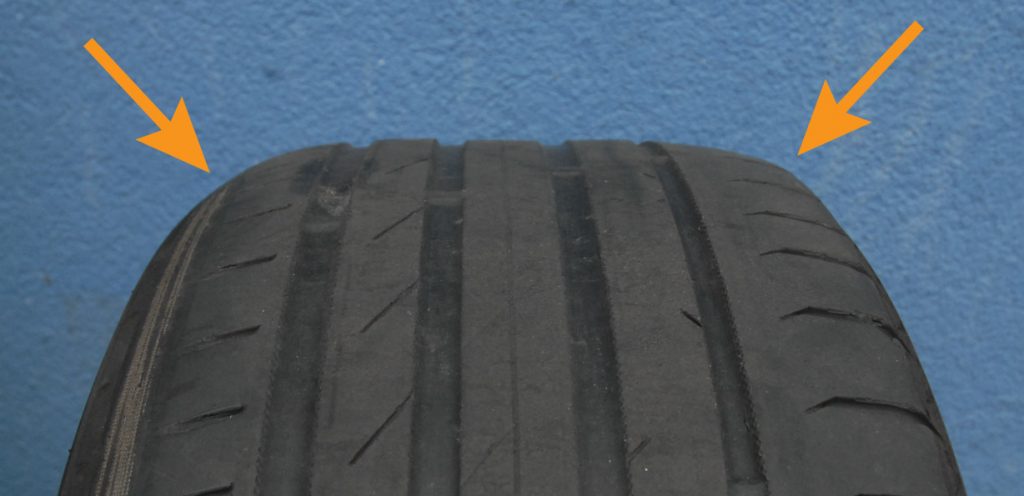
Now is a good time to check the tyre sidewall for damage – look for cracks and bulges.
While you’re at it, look for kerb damage on the rims. Also, see if the paint is not flaking off.
Uneven wear
Lastly, check if the tyres are worn evenly. Compare the inner part of the tread with the outer part of the tread. Uneven wear indicates wheel misalignment or some other problems with the suspension.
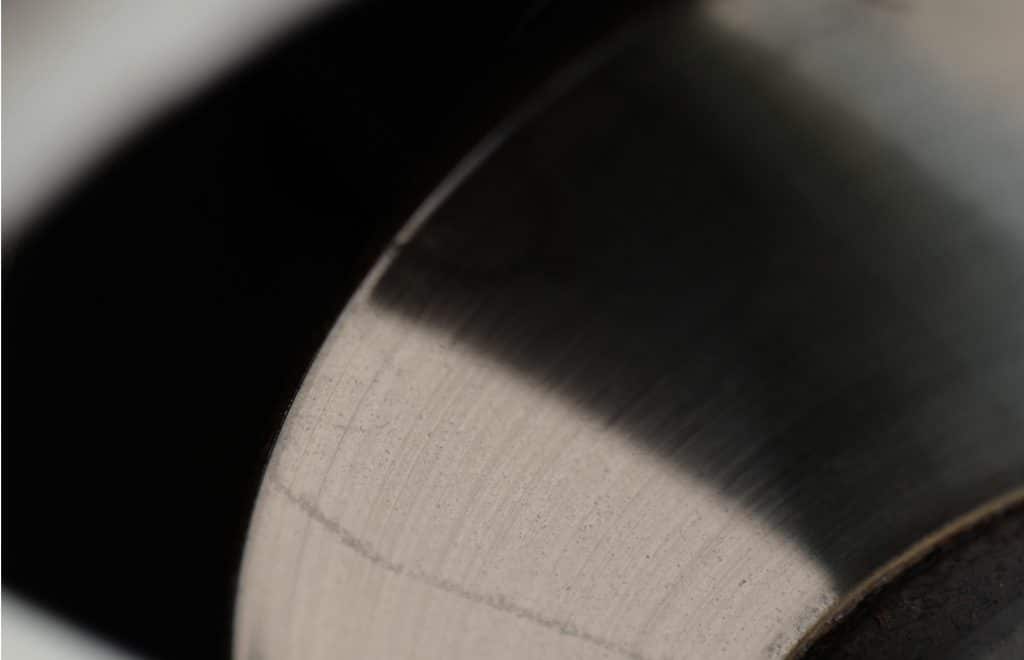
The condition of the brake discs
The last step before finally getting into the car is to visually check the condition of the brake discs. You should be able to do this in most cars with alloy wheels. Simply look through the spokes in the wheels to find out how worn the brake discs are.
A brand new brake disc is flat and has a nice shiny surface with no score marks. As the brake disc wears, a ridge starts forming on the outer edge of the rotor. The ridge appears because the brake pads don’t cover the entire surface of the brake disc.
Here’s what an almost new brake disc looks like:
And here’s what a worn brake disc looks like:
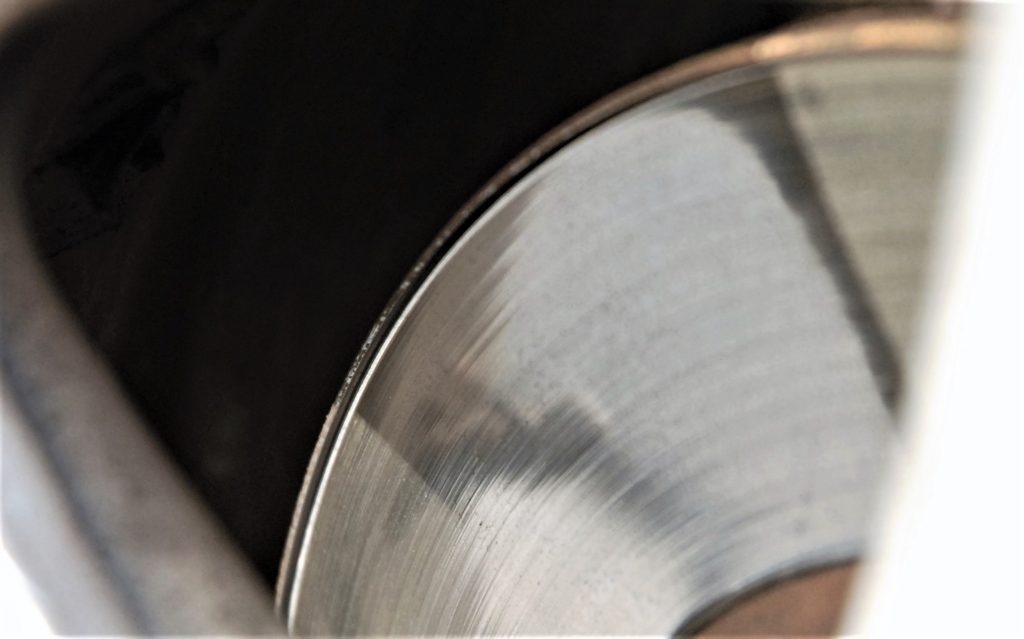
The brake disc above hasn’t got that much life left in it and will most likely need to be replaced the next time brake pads are changed.
And here’s a photo of worn out rear brake disc with a deep ridge:
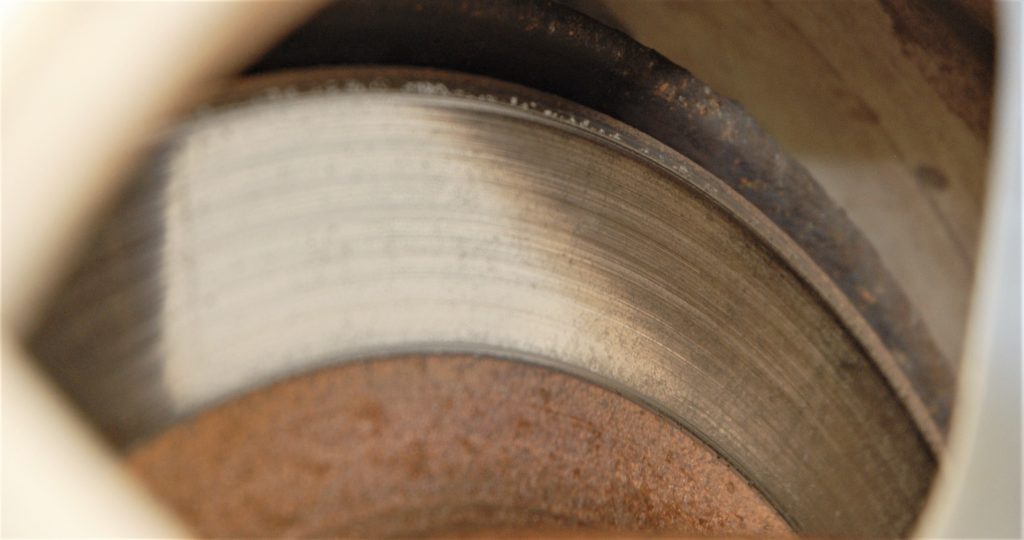
By checking the brake discs, you can find out if they will need to be replaced in the near future (or immediately if badly worn). Manufacturers specify a minimum brake disc thickness for the brakes to be safe.
You won’t be able to measure the thickness of the rotors with wheels on the car, but a quick visual check is really all you need.
Badly worn brake discs are a sign of neglect and a good reason to discuss the price of a second-hand car.
Checking the interior in a used car
Checking the interior is the last step before taking the car for a test drive.
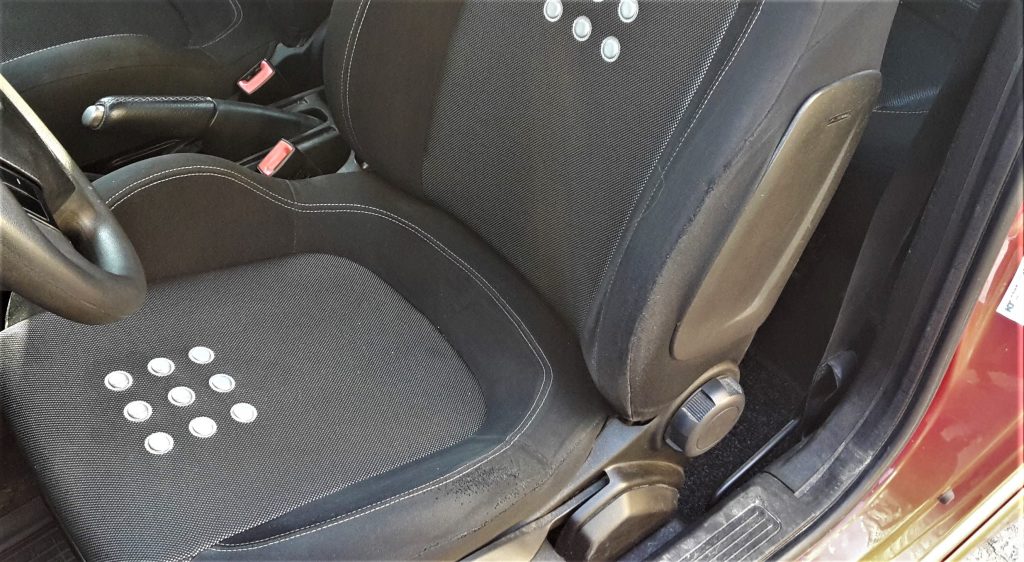
Look for wear in these places inside the cabin:
-
Seats (especially on the seat bolsters)
-
Steering wheel
-
Pedals
-
Gear stick
The key when checking the interior is to see if the wear patterns match the mileage of the car. Odometer fraud (rolling the odometer back) is common in some countries. Fortunately, it’s not a big problem in the UK. However, it’s super common in some places, for example, in Eastern European countries.
If you’re in a place where you don’t have to worry about clocked vehicles, simply check the condition of the interior and write down things that you don’t like.
Below are a few examples of typical interior wear in relatively old used cars.
Worn seat bolsters
The first thing you see when you open the door is the driver’s seat. Check it for wear. The first places that wear are usually the seat bolsters.
In case of leather seats, look for cracks and discolouration. Leather seats need to be cleaned and protected regularly to last. Ask the seller what products (if any) have been on the leather seats.
Worn steering wheel
The wear on the steering wheel varies between cars and manufacturers. Some are worn-out after 100,000 miles and some look fine after 150,000 miles. There is no rule. However, plastic steering wheels are generally more durable than leather steering wheels.
By the way, the “leather” in most cars is closer to plastic than it is to natural leather. This is unless you are buying a used Rolls-Royce, which I’m sure has real leather.
This is a topic for another time, though. Stay tuned for an article about looking after leather car seats and steering wheels.
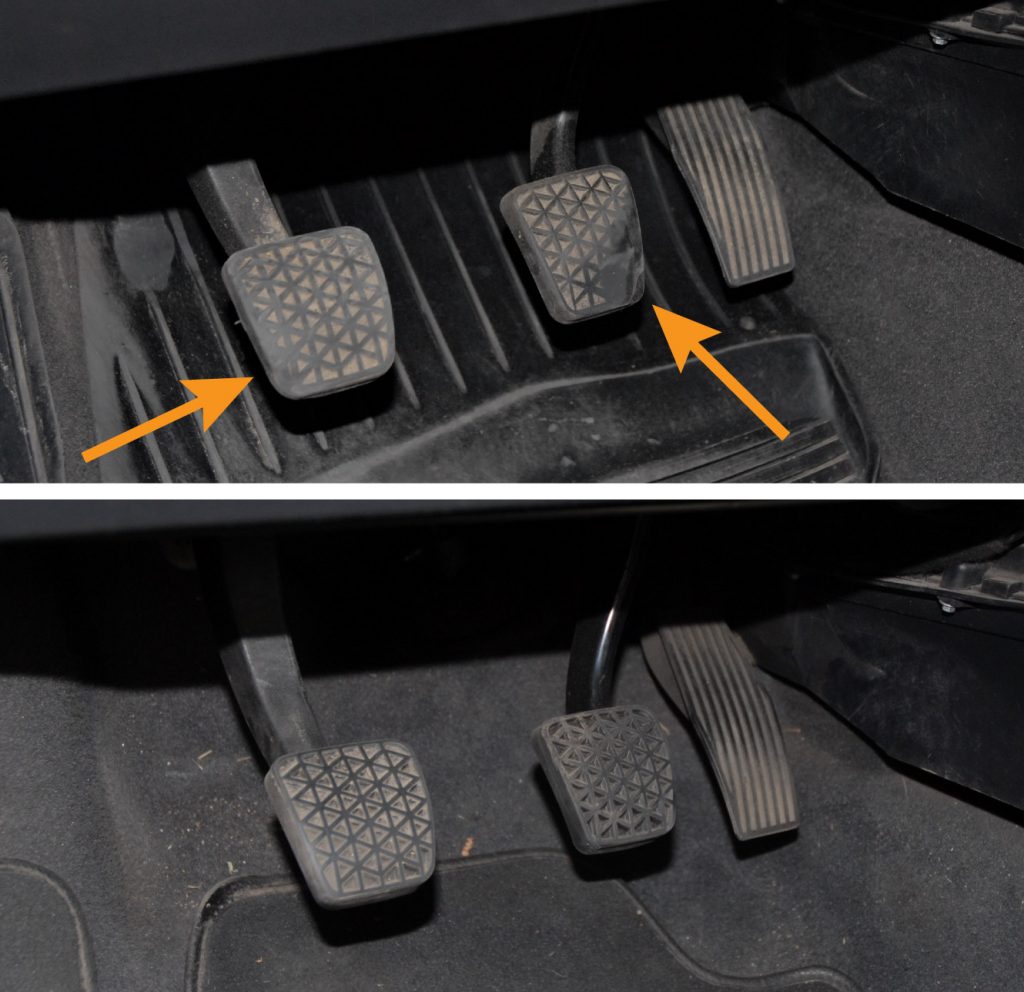
Worn pedals
In a country, where odometer fraud is common, a great way of establishing the real mileage of the car is looking at the pedals.
Here’s a comparison of a car that has 100,000 miles on the clock with a low-mileage car:
While you’re looking at the pedals, check for moisture under the carpets. Lift the floor mats and touch the floor in each foot well. The material on the floor should not be wet or have stains. If it does, it means there is a leak somewhere. This may or may not be a problem.
However, if you find moisture underneath the front carpets accompanied by a sweet smell, it’s likely a leaking heater core. The heater core is a small radiator that heats up the air entering the cabin. It uses hot engine coolant to warm the air.
The heater core sits just behind the dash, and in most cars, it is extremely difficult to get to (dash needs to be removed). A leaking heater core is an expensive problem.
Used car inspection summary
Congratulations, you’ve just completed the pre-purchase inspection. Based on what you’ve found so far, you might already have a pretty good idea of whether the car is in a good shape or not.
It’s time to take the car for a spin. I will cover the test drive and a few additional checks in part 4.
Press here for part 4: Test Drive
Don’t forget to print the inspection checklist before going to see a used car for sale. It will help you perform a thorough inspection.
If you found this article useful, please share it with your friends!
Judging relative wear-and-tear may reveal a defect even if individual inspection looks tolerable. That is even more true for someone who does not have the absolute knowledge. You do not want different wear on brake-rotors or pads left compared to right. The same goes for tyres.
I try to do my test-drives as smooth as possible. The idea is to listen to the car. It’s worth opening the windows for a a while as well. In that context you do not want the seller next to you distracting you in any way by talking or even operating any of the electrical controls in the car.
The oil leak test does require a motorway test-drive. Check for leaks before and after.