Used Car Buying Guide: Test Drive (Part 4)

This is part 4 of the Used Car Buyer’s Guide. In this part, we will take a used car for a test drive.
The test drive takes places after the Pre-purchase Inspection (part 3). If you haven’t read it yet, here’s the link.
Things to check before the test drive
Before taking the car for a test drive, spend a few minutes to make sure that there are no warning lights and that all the car features work. The paragraphs below explain what to check.
Car dashboard warning lights
Look at the dashboard with the ignition on but the engine turned off. When you turn the ignition on, the car will do a self-test and illuminate all the service lights (to check that they are working).
-
Key-operated cars – turn the key to the ON position, don’t start the engine
-
Cars with a push-button start – press the start button without pressing on the brake pedal, the dashboard lights should illuminate without starting the engine
First, locate the Malfunction Indicator Light aka the “Check Engine” light that looks like one of these:
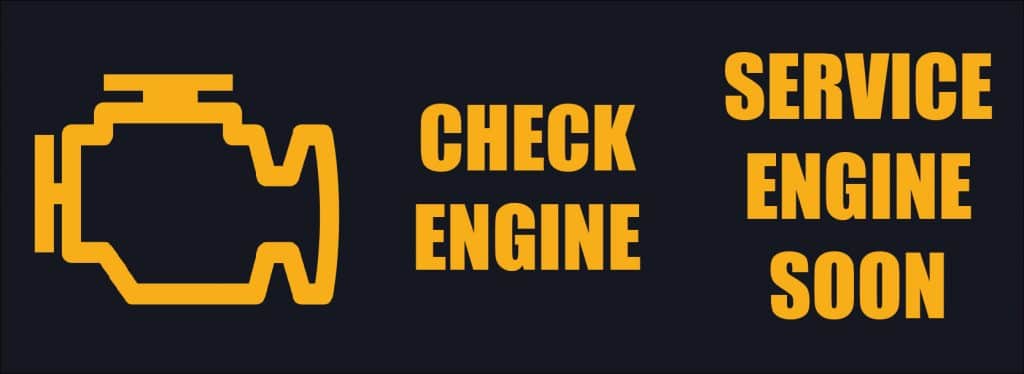
You’ve probably seen these icons before. They all mean the same thing – that there is a problem with one of the car’s systems, and an error code related to that problem has been stored in the car’s memory.
As the car is currently performing a self-test, this light should remain illuminated until you start the engine.
Next, find the ABS warning light that looks like this:

The ABS warning light indicates that there’s a problem with the anti-lock braking system and that the ABS has been disabled.
Cars without ABS won’t have an ABS warning light, obviously.
Finally, locate the airbag warning light. It looks like one of these:

The airbag warning light indicates a fault in the supplemental restraint system (SRS) and that the airbags won’t deploy in an accident (either because there’s a problem with the system or an airbag is missing).
Both the ABS and airbag warning lights should disappear a few seconds after turning the key. The “Check Engine” light, however, will remain illuminated.
Once you find the three lights (“Check Engine”, ABS and airbags), start the engine. When everything is okay, the “Check Engine” lights should turn off a couple seconds after the engine starts. This means that the engine is running correctly and that none of the electronic sensors are reporting errors.
What if you can’t find the “Check Engine” light?
It means that someone may be trying to scam you into buying a car with a hidden fault. It is possible to disable the “Check Engine” light by removing the light bulb behind the dashboard or hiding the light with some black tape.
It is a trick used by scammers (no other way to put it). Obviously, you should walk away from the sale if the “Check Engine” light has been disabled. Giving the seller the middle finger is optional.
The light bulbs occasionally die on their own, but it’s very rare. If you encounter a car with a missing warning light, don’t buy the car.
The same goes for the airbag (SRS) warning light. If the car has airbags and the airbag light never turns on, it means that it may have been disabled on purpose to hide the fact that the airbags had deployed in an accident and were never replaced.
The used car inspection checklist will remind you to have a look at the service lights. Remember to print it and take it with you when buying a used car.
It is very rare for anyone to try to hide the warning lights, but it’s better to be safe than sorry.
Cars with adaptive suspension, air suspension or all-wheel-drive may have additional dashboard icons related to the suspension or the transmission. See if you can find any of those and that they turn off once you start the engine.
Check the car’s equipment
Start by checking the standard equipment and then check anything that’s specific to the car. Anything that doesn’t work is a good reason to negotiate the price of a used car.
The things that you should check are as follows:
-
Air conditioning
-
Heater and fan
-
Windshield wipers and washers
-
Electric windows
-
Power seats and mirror controls
-
Radio and CD player
-
Rear window defogger
-
Lights (don’t forget to check the fog lights)
-
Cruise control (you will check it during the test drive)
You may not be able to check the rear window defroster directly when it’s warm outside. What you can do is to look at the RPM gauge and turn the defroster on.
If the RPM drops slightly or fluctuates for a couple seconds, it means that the defroster is working (extra load on the engine). The RPM may also go up slightly when you turn the defroster off.
The A/C just needs a charge
When the seller says that the A/C only needs a charge, watch out. In the majority of cases, it doesn’t just need a charge. It will need regassing… and new compressor… and a new condenser… and a blessing from the Norse Gods to ever work again.
If it’s working but not cooling as well as it should, that’s when it only needs recharging (or the radiator fan isn’t working).
Don’t accept a car with a broken A/C without a major discount.
It’s simple to check the A/C when it’s hot outside. It’s when you are buying a car in winter, that’s when it becomes tricky.
Here are a few things that you can do to test the A/C in winter:
-
Take the car to a heated garage, for example, to a shopping centre. Check the A/C there.
-
If you can see the A/C compressor in the engine bay, check that the compressor clutch engages when the A/C is turned on. If it doesn’t, it’s dead.
-
Sit in the car for a few minutes with the blower off until the windows fog up. Then turn the A/C and heat to maximum. See how quickly the fog goes away. Then repeat the same just without the A/C. It should take longer without the A/C because the A/C dries the air.
Check the car-specific features
This guide is intended for an average car. If the second-hand car you are looking to buy is a convertible or has some advanced features like air suspension, don’t forget to do the checks related to those car-specific features.
See if you can find the car you are planning to buy in the Car Database for more information about the things that should be checked on that particular car model.
How to inspect a used convertible
When inspecting a used convertible car, your two biggest concerns are hydraulic system issues (mainly leaks) and weather intrusion (fancy name for a leaking roof).
Here are the things to check in a convertible:
-
Check for any dampness in the footwells, carpets and in the boot. It’s best to do it after rainfall.
-
Open and close the roof a couple times to make sure that it works.
-
Check the condition of the roof fabric and the plastic windows if the car has a soft top roof
-
Check the condition of the roof seals. Ideally, they should be lubricated regularly – ask the previous owner about it.
-
Look for hydraulic fluid leaks – in the boot, on the headliner and around the hydraulic rams.
-
Get the car up to 60 mph with the roof closed and listen for excessive wind noise.
-
Listen for rattling noises while driving with the roof closed.
-
Take the car to a high pressure (touchless) car wash and see if any water gets inside the cabin or the boot.
Vibrations in the cabin
As you are sitting in the car and checking its features, take a moment to feel if there are any vibrations in the cabin when the engine is running.
Keep in mind that petrol cars are smoother in idle than diesel cars. A little bit of vibration is normal in diesel-powered vehicles.
Vibrations in idle could be a symptom of worn-out motor mounts or a failing dual-mass flywheel. The latter is a much more expensive problem.
If you notice anything out of the ordinary, make a note on the checklist.
Symptoms of a failing dual-mass flywheel
The dual-mass flywheel (DMF) is a torsional damper fitted between the engine and the clutch. It’s an evolution of the traditional solid flywheel. Its job is to smooth out the jerky nature of the engine’s power delivery.
Dual-mass flywheels are fitted to nearly all modern vehicles with manual and dual-clutch transmissions (as if those weren’t complex enough). Automatic transmissions with torque converters don’t have dual-mass flywheels.
If you’d like to read more about dual-mass flywheels (and why I don’t like them), see the article about the problems with modern diesel cars and the KISS principle.
Replacing a DMF is expensive. Therefore, remember to check the used car you are planning to buy for symptoms of DMF failure:
-
Rattling noises when the car is idling are a typical sign of impending DMF failure. With the transmission in neutral, press the clutch pedal a few times and listen for any changes in drivetrain noise. This is also how you check for a worn-out clutch release bearing – it will rattle when the clutch pedal isn’t depressed. Two birds, one stone! Do this with the window open to hear it better.
-
Vibrations in the cabin when the engine is idling. Vibrations may also occur during acceleration at low engine revs, which is exactly what the dual-mass flywheel is supposed to prevent. A worn-out DMF will not do its job properly.
-
Another telltale sign of a worn out DMF is when the car shakes when you turn off the engine. This may be accompanied by a rattling noise. With the driver’s window open, turn the engine off, and pay attention to any vibration/noises. Do this twice.
-
Finally, juddering may occur when starting from a standstill
Here’s what a rattling dual-mass flywheel sounds like:
The one below is less obvious because of the loud engine, but you can hear it clearly when the engine stops:
How to test drive a used car
As you can see, you can learn a lot about the condition of the car by listening to it. You’ve just checked the dual-mass flywheel this way, and you should remain focused on the sounds the car makes during the test drive.
While problems with the electronic parts in the car are usually picked up by the on-board diagnostic system (OBD) and communicated to you via warning lights and error codes, you will have to rely on your senses to check the mechanical parts of the car such as the brakes or the suspension.
When you test drive a used car, you should turn off the radio and put the fan speed on low. This is so that you can hear if the car makes noises that it shouldn’t. When a dodgy car dealer insists on turning up the stereo to “show you how great it is”, it may not be about the stereo at all – he just doesn’t want you to hear the knocking suspension or crunchy gear changes!
Hopefully, you’ll never encounter people like that, but if you do, at least you know what’s going on.

The test drive should be divided into two sections – some low-speed urban driving and a bit of high-speed motorway driving. The high-speed run (70 mph) needs to last only a few minutes, but it is quite important, in my opinion.
Drive the car normally but stay focused on the driving experience and do the checks listed below.
In part 3 (pre-purchase car inspection), I’ve explained what the exhaust smoke can tell you about the condition of the engine. If you came to see a used car with a friend, ask him to drive behind you for the first few minutes of the test drive and look for exhaust smoke. This step is optional but worth doing if you already came with someone.
Low speed (urban) test drive
The first part of the test drive is just doing a few miles around the town.
The things that you should check are as follows:
-
the handbrake
-
the CV joints
-
the operation of the gearbox
-
the brakes and the ABS system
-
the condition of the suspension
Check the handbrake
The first simple test during your test drive is to check the handbrake.
Get the car moving slowly, and apply the handbrake to see if the car stops. Do this at a very low speed (5-10 mph) and with the transmission in neutral. Once the handbrake is applied, the car may roll for a few meters, but it should come to a stop.
Alternatively, you can check the handbrake later while standing on an incline. I like checking the handbrake at the beginning of the test drive as there might be no opportunity to stop on an incline.
As for cars with an electric parking brake, the procedure is exactly the same – hold the button until the car stops. Be aware that an electric parking brake may brake more sharply than a manual handbrake.
Check the CV joints
The next simple test is to open both front windows, turn the steering wheel all the way in one direction and drive in a circle. This is to check that the CV joints are in good shape. You can do this at the beginning of the test drive, or you can take the car to a shopping centre parking lot if there is not enough room to manoeuvre.
In part 3 of this guide, you’ve already checked the CV joint rubber boots for damage. Now, you are checking the CV joints directly. When one of the CV joints is worn out, you will hear a clicking sound.
Afterwards, repeat the same steps but drive in the other direction.
Here’s an example:
Check the clutch operation (manual transmission)
In most modern cars, the clutch is operated by a hydraulic cylinder. The system is self-adjusting, which means that the clutch bite point doesn’t say much about the condition of the clutch like it used to in cars with cable-operated clutches.
With a bit of practice though, you should still be able to tell when the clutch is on its way out or if there are other problems related to the transmission.
Drive the car normally, and as you operate the clutch when changing gears or at the traffic lights, look out for these warning signs:
-
the clutch pedal is hard to press
-
the clutch pedal vibrates
-
the clutch slips when you try to accelerate (most likely to occur at peak engine torque: 2000-2500 RPM for a turbodiesel car and 4000 RPM for a petrol car)
-
selecting gears requires force
-
the gear changes are noisy (clunking or crunching noises)
-
the clutch bite point is inconsistent or extremely high/low
-
the gear changes are jerky and it’s difficult to operate the clutch smoothly
-
the clutch release bearing is noisy (already checked at the same time as the dual-mass flywheel)
It’s good to know that clunking gear changes and vibrations in the cabin at idle are typical symptoms of worn-out transmission or engine mounts.
The motor mounts are rubber parts that wear out and degrade over time.
Worn-out motor mounts allow the engine and transmission to move excessively when changing gears and during heavy acceleration. When they are worn out, you may experience symptoms that look like a gearbox-related problem at first glance.
How to test drive a used car with an automatic transmission
First of all, pay attention to how smoothly the transmission shifts from “Park” to “Drive” and “Reverse”. Also, try going from “Reverse” to “Drive” directly. If the gear engagements are rough and accompanied by clunking noises or they shake the car, there is a problem somewhere.
It could be a problem with the transmission or it could be just a worn-out transmission mount. If you can’t tell the difference, don’t take the risk and look for another car.
When test driving a car with an automatic transmission, pay attention to the difference in how the transmission behaves when it’s hot and cold. Once it warms up, the gear changes tend to be slightly smoother, but the difference should not be dramatic.
During the test drive, look out for the following warning signs:
-
harsh shifting
-
erratic shifting or delayed gear changes
-
transmission slipping when changing gears – the engine revs surge before the next gear engages
-
missing gears (for example, shifting from 2nd to 4th, this is a major problem)
-
transmission dropping out of gear – the engine revs go up quickly but the car does not accelerate (this is a major problem)
Don’t forget to check that the kickdown works – step on the gas and the car should downshift and accelerate.
Lastly, check that the torque converter lock-up works. The lock-up is a clutch that mechanically locks the torque converter to improve transmission efficiency when cruising (torque converter slip eliminated). In some cars, the lock-up feels like an additional gear change, while in others it’s barely perceptible.
To check that it works, maintain a constant speed of 50 mph and start pressing on the accelerator pedal progressively harder. Initially, you should feel that the engine is mechanically connected to the wheels. The car will accelerate gently. Both the tachometer and speedometer needles should start rising slowly – the tachometer needle should not jump.
As you press harder on the gas, the torque converter should unlock and you will see that the engine RPM jumps up. At this point, the car should be accelerating fairly quickly. If you press even harder, the transmission may decide to downshift (another RPM jump).
If you’re familiar with automatic transmission cars, this behaviour is easy to spot. The engine and transmission need to be warmed up, otherwise, the torque converter lock-up may be disabled.
Check the car suspension
There are a few things that can tell you that there’s a problem with the suspension in a used car. Here are the typical symptoms of worn-out or damaged suspension parts:
-
uneven tyre wear (misaligned or worn-out suspension) – already checked during the pre-purchase inspection
-
car leaning to the side (a broken suspension spring) – also already checked during the pre-purchase inspection
-
play in the steering wheel and loose steering feel (worn-out suspension parts)
-
knocking noises coming from the suspension (worn-out or damaged suspension parts)
-
bouncy ride (faulty shock absorbers)
-
growling noise (worn-out wheel bearing)
Worn-out suspension parts often make knocking noises, and these noises are more likely to appear when going over speed bumps or potholes. This is why driving a car over some speed bumps should be a part of every test drive.
Ask the seller to lead you to a street with a rough road surface or some speed bumps. Here’s what a typical suspension knock sounds like:
Apart from the noises, pay attention to how the suspension deals with the impacts when going over potholes or speed bumps. Does it absorb the impact when hitting bumps or does the car become bouncy? A bouncy ride is the main symptom of worn-out shock absorbers. Their role is to absorb the energy when the suspension deflects.
Here’s what shock absorbers do:
When you drive the car over a bump in the road, the suspension deflects to smooth out the impact – the suspension springs compress.
Without shock absorbers, the suspension springs would then give back almost all of the energy that they took in when hitting the bump in the road, thus, making the car bounce. Shock absorbers dissipate that energy so that the car doesn’t bounce.
Here’s what happens when there are no shock absorbers (or they are completely shot):
Another symptom of failing shock absorbers is when they start leaking oil, but you’ve already checked that during the pre-purchase inspection.
Let’s continue with the test drive and the sounds of broken stuff.
Below is what a bad wheel bearing sounds like. The noise may appear or disappear when turning. Turning puts an axial load (side load) on the wheel bearings. Depending on which one is damaged, turning the steering wheel may amplify the noise or make it disappear.
Check the brakes and the ABS
When an opportunity arises, test the brakes. Do it on a straight road and make sure there are no cars behind you. Also, let the seller know that you are about to test the brakes.
The anti-lock braking systems, fitted to pretty much all modern cars, prevent the wheels from locking up, which makes the car maintain traction during braking. This is critical when braking and swerving at the same time, which is what most people tend to do in emergency braking situations.
To test the ABS, you should be doing 30 or 40 mph and you need to press on the brakes hard enough for the ABS to engage. When the ABS engages, you will feel the brake pedal pulsating. This is accompanied by a distinct chattering noise as the brakes rapidly engage and disengage.
Also, pay attention to the direction the car is going – it should not pull to the side when braking.
If you can’t get the ABS to engage, even if you press on the brakes very hard, it could be one of three things:
-
the brakes are too weak, which is a bad sign
-
the ABS isn’t working
-
you are test driving a Lamborghini and simply going too slowly
Earlier, you’ve checked that there were no ABS warning lights on the dashboard when you started the car. This real-world test just confirms that the brakes and ABS work well.
Pay attention to the engine sound
The engine contains many moving parts, therefore, many opportunities for noise when something is wrong.
It could be knocking diesel injectors (typically accompanied by some black smoke during acceleration), clicking valvetrain (incorrect valve lash or worn out parts), a squealing accessory belt or whining bearings in the alternator.
Basically, there should be no weird noises coming from the engine when the car is idling, nor during the test drive.
By the way, the worst sound to hear is knocking connecting rods (very expensive to fix). Hopefully, it’s something that you’ll never encounter, but it sounds like this:
Knock knock
Who’s there?
Rod
Rod who?
Rod knock!
Sorry, I couldn’t help myself…
High speed (motorway) test drive
During the high-speed part of the test drive, you should pay attention to:
-
the acceleration (look for problems: car struggling to accelerate, misfires, slipping transmission)
-
steering wheel play (there should be none)
-
vibrations on the steering wheel (unbalanced/damaged wheels or worn-out suspension)
-
car pulling to the side (incorrect wheel alignment, worn suspension or sticking brakes)
-
noises coming from the gearbox or the differential
-
the coolant temperature (make sure the engine reaches the operating temperature and doesn’t overheat)
-
check the cruise control (where applicable)
Ask the seller to lead you to a stretch of road where you can take the car to 88 mph and see if it takes you back in time.
Just kidding… no more bad jokes, I promise.
You need to find a road where you can reach about 70 mph. This part is important because some things only become noticeable at higher speeds, for example, an unbalanced wheel typically causes vibrations on the steering wheel around and above 60 mph. Now, wheel imbalance can simply be a missing weight, but it could also be a damaged rim, which is a more expensive problem.
This is the time when you can put the pedal to the metal and check that the car accelerates smoothly through the entire rev range. I recommend getting close to the redline at least once. Just warn the seller that you would like to do an acceleration test.
Start at low RPM and plant your right foot on the accelerator pedal. Pay attention to any noises coming from the engine and if there are any engine misfires (especially at low/mid RPM).
Is the car as fast as it should be (or as slow as it should be) given its specs?
Also, look at the RPM gauge to see if the transmission is not slipping and that you don’t hear any weird noises coming from the transmission or the differential (I’ll show you an example in a moment).
Once you get to around 70 mph, slowly loosen your grip on the steering wheel on a stretch of straight road. See if the car tracks straight and doesn’t pull to the side (when cruising and also when accelerating). Pay attention to any vibrations on the steering wheel.
If the car has cruise control, now is a good time to check that it works.
And for the final test, apply the brakes moderately hard (not nearly as hard as when checking the ABS earlier). See if the car keeps going straight or pulls to the side when braking.
Gearbox and differential noises
A noisy gearbox may only become noticeable when the car is moving fairly quickly. Make sure there are no crunching noises when changing gears and watch out for whining bearings or gears.
If there’s a problem with the bearings or the transmission gears are worn-out, you may hear a whining or howling noise. The noise may appear only in certain gears. It is also more likely to appear during acceleration.
This is what it sounds like:
And this concludes the test drive!
The checks described above should give you a pretty good idea about the condition of the suspension, the brakes, the engine and the transmission in the car you’ve been test driving.
What to check after the test drive
Before you are done with the car, here are three final checks that are worth doing.
After the test drive, you should check:
-
that the brakes are not dragging
-
the automatic transmission fluid (where applicable)
-
the hardness of the radiator hoses
After you stop the car, put it in neutral and see if it starts rolling. It should if you’ve stopped on an incline. If the car doesn’t move, open the door and step out.
Grab the A-pillar and push the car to get it to move (don’t push on the door). It shouldn’t require much force to get the car to move at least a little bit. If you can’t get it to move at all, one of the brake callipers may be sticking.
If you think that there is too much resistance, go and touch one of the rear rims near the hub. Feel if it’s warm or hot. It shouldn’t be because the rear brake discs don’t generate that much heat. The majority of the braking force is applied to the front wheels. Now check the other rear wheel.
Next, do the same thing with the front wheels. It’s perfectly normal for the hubs or the rims to be warm, but they should not be hot after a short test drive.
Look for a difference between the wheels. The one with a sticking brake calliper will most definitely be warmer than the other wheels. In severe cases, the rim can get fairly hot.
And here’s a simple test that may reveal a leaking head gasket:
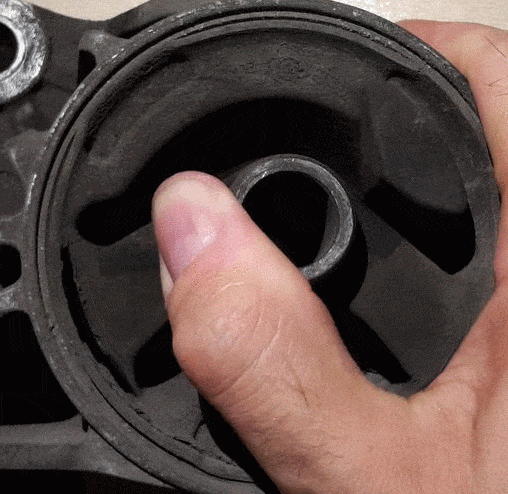
Open the bonnet and leave the engine running. Under the bonnet, you need to find one of the radiator hoses going from the engine to the radiator. Please be careful – the hose will be fairly hot and don’t stick your hands into the radiator fan.
The upper radiator hose looks like this:
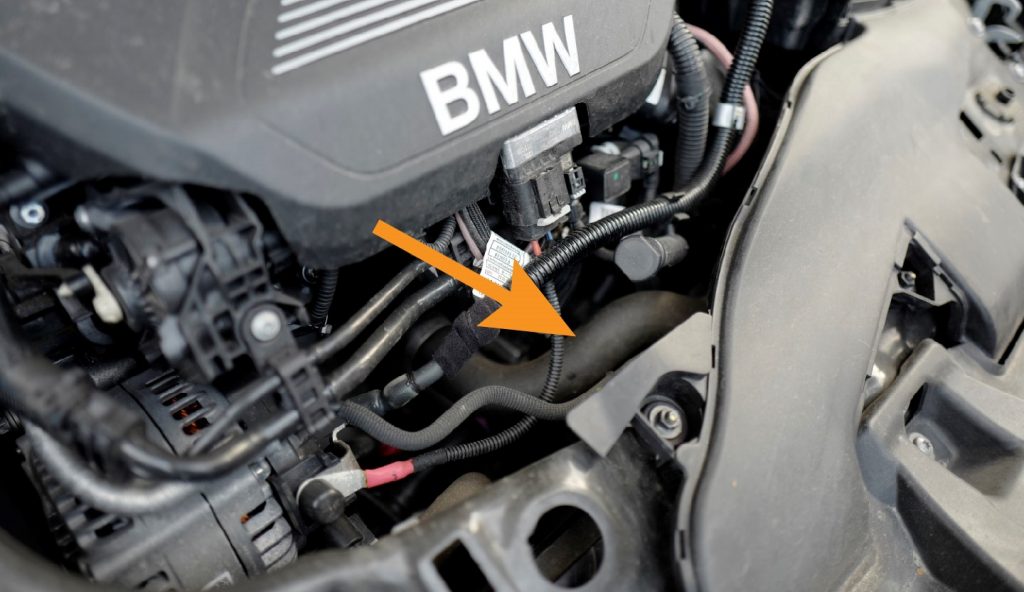
Grab the hose and ask the seller to rev the engine to 2000-3000 RPM. Squeeze the hose when the engine revs up.
It should be pliable. If it’s very hard, there may be a problem with the head gasket (combustion chamber pressure entering the coolant circuit).
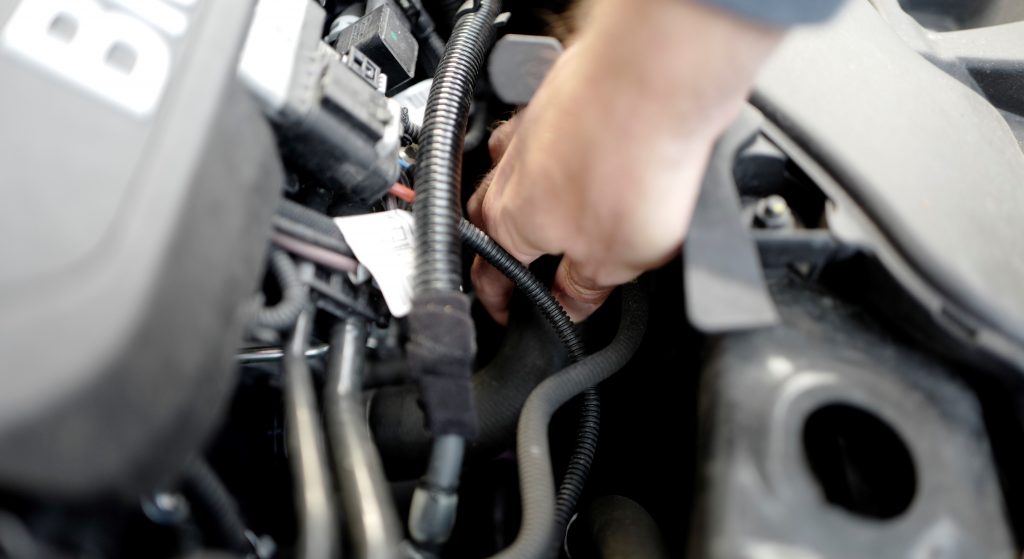
When the engine is cold, the radiator hoses are flexible. When the engine is warm, they may become fairly hard. This is normal as the cooling system works under pressure. However, a rock hard radiator hose is a bad sign. You can try this out on your current car to get the feel for it.
Before turning the engine off, remember to check the level and colour of the automatic transmission fluid (where applicable). I’ve explained what to look for in part 3 of this guide: the pre-purchase inspection.
Check the service book and the receipts
Ask the seller to show you the service book and any receipts for maintenance work. Some people like to keep the invoices and receipts, some don’t.
It is much better when a thorough documentation is available. I mentioned in part 2 of this guide (choosing a used car) that not having a full service history can reduce the value of a used car by up to 20%. The newer the car, the bigger the loss.
If the car you are planning to buy is missing stamps in the service book, or there are no receipts for maintenance work, you should negotiate the price of the car or walk away from the sale.
If you’ve checked the car thoroughly and it is in good condition, it’s okay to buy a used car without a service history, but don’t pay the full market price, because you may struggle to get your money back when you try to sell the car in the future. Most used car buyers care about having documented service history and so should you.
Besides, a set of stamps in the service book and a stack of receipts prove that the previous owner took good care of the car.
Older cars are likely to be serviced at independent garages, which is perfectly fine as long as there are receipts to prove that.
Please be cautious when the seller tells you that the car was recently serviced but there is no receipt to prove that. Always try to verify the seller’s claims yourself – if there is no receipt that confirms the maintenance work, have a look under the bonnet to see if the parts mentioned have indeed been replaced.
Like I said earlier, truly dishonest sellers are a small minority, but better safe than sorry.
And there’s a lesson here for you too: always keep the receipts.
There’s one last thing to know about service books. It is possible to buy a blank service book and fake the service history. If you’re having doubts about the honesty of the seller and the service book, call the dealership. They keep an electronic record, so they can verify the authenticity of the service book.
Check the VIN and the car registration documents
There is always some paperwork to deal with when buying a car.
In the UK, both parties need to fill in the V5C registration document. The seller then needs to deliver it to the DVLA (by post or online). The buyer should receive the new keeper supplement.
Remember that the car needs to have a valid MOT and you will need to have your own car insurance in place before you can drive away after finalizing the deal. You will also need to pay the Road Tax as it’s no longer transferrable.
Click here to read more about the essential paperwork in the UK.
I’m not going to go into details about the documents and car insurance because the paperwork and the rules are different in each country. That said, you need to make sure that you understand the process of buying a car and the documents associated with it.
Regardless of where you live, these are the three most important things to remember when buying a used car:
-
The paperwork must match the vehicle. Find the vehicle identification number (VIN) on the car chassis and compare it with the VIN number on the car documents. It needs to match.
-
The seller must the legal owner of the vehicle. Ask the seller to show you an ID and the name on the ID must match the name on the paperwork.
-
The paperwork must be complete and correct. Be cautious when the addresses don’t match or there’s a missing document. It’s best to just walk away from the sale.
Signs that the seller is dishonest
Here are some red flags that may indicate that the seller isn’t honest and that you should proceed with caution or walk away from the sale:
-
Bad feedback online – you should check the seller’s feedback before going to see the car. To me, bad feedback is an immediate disqualification
-
The seller is eager to cut the test drive short
-
The seller pushes for a quick sale
-
When inspecting the car, you find things that don’t match what the seller told you or what was written in the ad
-
The car has cheap mismatched tyres – this may not be a big deal money-wise, but it tells you a lot about the attitude of the seller and how the car has been maintained
-
The engine and the oil pan have been washed (an easy way to hide oil leaks)
-
The car is already warmed up when you arrive despite a phone arrangement to start a cold engine
-
The “Check Engine” light isn’t working
-
The car shows low mileage on the odometer but the interior looks worn-out (poor maintenance or potential odometer fraud, a bad sign either way)
-
A mess in the paperwork – the maintenance receipts that were supposed to be there suddenly go missing or there is no service book
-
A private seller selling the car after a few months of ownership – this may be a sign that the seller wants to get rid of a problematic car
Ignore the bullshit
If you go to see a car sold by a used car dealer, you are likely to hear a lot of sales speak while you’re trying to concentrate on checking the car. I’m referring to things like:
-
“Great car, these engines are great, very reliable.” – An empty statement. You will hear the same thing about any car you pick.
-
“My sister had one of these. She drove it for 3 years without any trouble at all” – Perhaps that was her experience, it may not be yours. Does the sister character even exist?
-
“It’s a very popular car” – Oh, really? Then there are probably 3 more like it for sale in your area, so you don’t have to commit to this one.
-
“The gearbox is bulletproof!” – said about a car with the M32 gearbox 😉
Statements like these are usually harmless and just part of the sales job. It’s best to ignore the bullshit and carry on with your car inspection. This is unless the seller is clearly lying to you.
In such a case, you should stop the inspection and walk off. There is plenty of fish in the sea and plenty of second-hand cars for sale.
Yay or Nay
One final piece of advice I can offer is not to rush into making a decision. Hopefully, the car you go to see doesn’t have any major problems and is as advertised. This makes for a straightforward purchase as long as you can agree on a price that both parties are happy with.
Always negotiate the price (including the trade-in value for your car).
If you do find problems with the car you were planning to buy, figure out how much it’s going to cost you to get them fixed before buying the vehicle. Don’t feel rushed and don’t make an emotional purchase. You are under no obligation to buy the car there and then, especially if the car has flaws that weren’t mentioned in the ad description.
Be rational – go home, call a local garage for a quote, and then make the decision. If you do decide to buy a car that’s got some flaws, use them to your advantage when negotiating the price.
When you finalize the deal, these are the things that you should receive with the car:
-
toolkit & spare tyre (where applicable)
-
spare key
-
car owner’s manual
-
radio code
-
service book
-
receipts for maintenance work
-
registration documents & proof of purchase/ownership
This is the end of the Used Car Buyer’s Guide. I hope it helps you buy a reliable car that you’ll be happy with.
Don’t forget to print the used car inspection checklist when going to view cars for sale.
And once you buy a car, take good care of it and make sure that the timing belt is not overdue.
If you found this guide useful, please share it with your friends!